
If you’re looking to give your home a fresh look without emptying your wallet, you’re in the right place! This collection of 40 creative DIY projects will inspire you to transform your space with inviting decor and stylish enhancements, all while sticking to your budget. Let’s dive in and explore how a little creativity can go a long way in elevating your home!
Upcycled Pallet Coffee Table
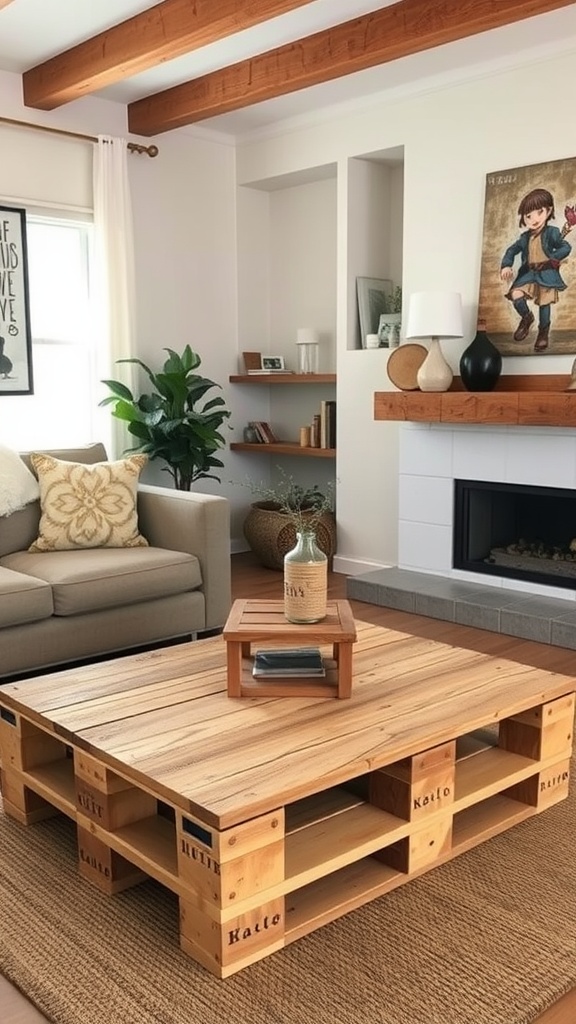
Transforming old pallets into a coffee table is a fun and budget-friendly project. This upcycled pallet coffee table brings a rustic touch to any living space. The table is made from wooden pallets, giving it a charming, homey vibe. You can easily customize it to fit your style.
In the image, the coffee table is the centerpiece of a cozy living room. Its natural wood finish complements the soft tones of the sofa and the warm wooden beams overhead. Accented by a cute wooden tray and a decorative bottle, it’s a perfect spot for drinks or books.
Building a pallet coffee table doesn’t require extensive skills. Start by sanding the pallets to create a smooth surface. You can paint or stain them to match your decor. Finally, secure the pallets together and add legs if you prefer a raised design.
This DIY project not only saves money but also helps reduce waste by repurposing materials. It’s a simple way to add a personal touch to your home.
Mason Jar Herb Garden
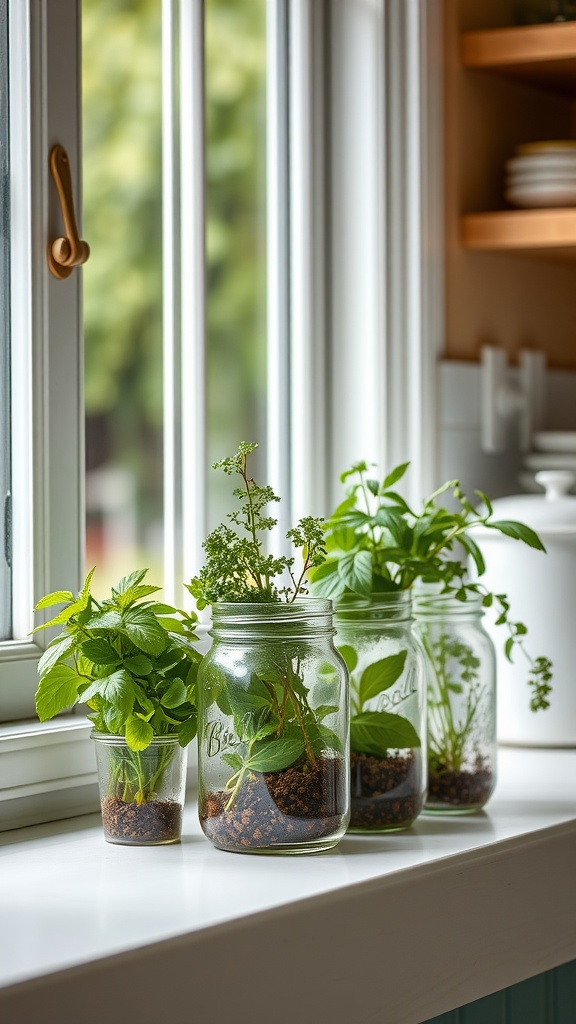
If you’re looking for a simple way to bring some greenery into your home, a mason jar herb garden is the perfect DIY project. This setup not only adds a pop of color to your kitchen but also gives you fresh herbs at your fingertips.
In the image, you can see several mason jars filled with various herbs, sitting neatly by a window. The jars are filled with soil and different types of herbs like basil, mint, and parsley. The sunlight streaming through the window helps the plants thrive, creating a cheerful atmosphere.
Creating your own herb garden is easy and budget-friendly. Simply gather a few mason jars, some potting soil, and your favorite herb seeds or seedlings. Fill each jar with soil, plant your herbs, and place them on a sunny windowsill. Remember to water them regularly and enjoy watching them grow!
This project is not only practical but also helps enhance the freshness of your meals. Having fresh herbs handy can elevate your cooking without needing to spend much. Plus, it’s a fun activity that brings a bit of nature indoors.
Customized Throw Pillows
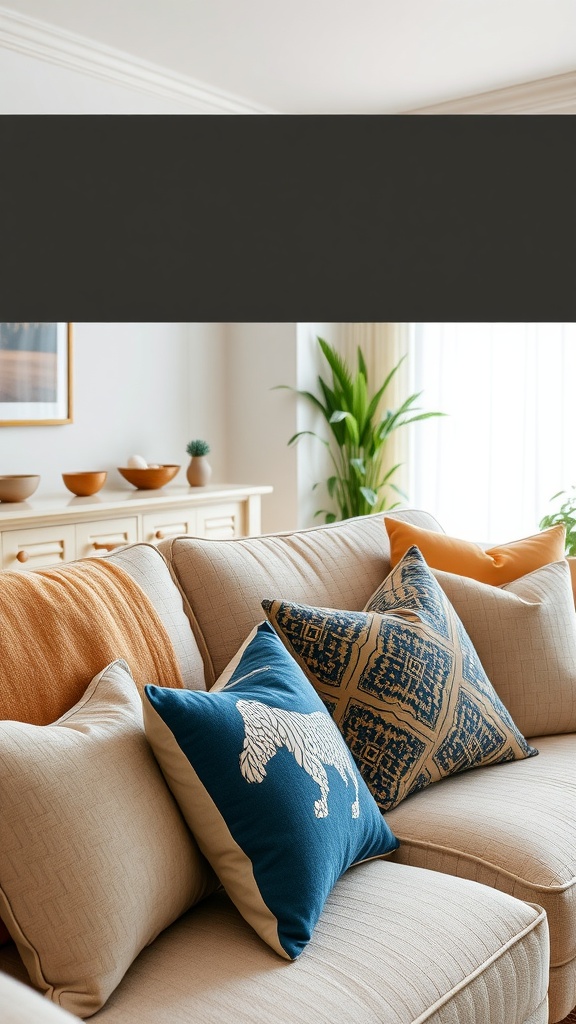
Throw pillows are an easy way to add personality to your living space. They can instantly transform a basic couch into a cozy and inviting area. By customizing your throw pillows, you give a unique touch to your home without breaking the bank.
Take inspiration from the image above, which showcases a mix of colors and patterns. The mix of neutral tones with vibrant colors creates a warm and welcoming atmosphere. Notice how the blue pillow with a playful design stands out among the more subdued shades. This approach allows you to express your style while keeping your decor cohesive.
For a DIY project, consider using fabric paint or iron-on transfers to create your own designs. You can find affordable pillow covers at craft stores or online. Simply choose your favorite colors and patterns to match your theme. This way, you can easily change your decor, especially with the seasons!
Remember, the key is to have fun. Whether you go for bold graphics or subtle textures, personalized throw pillows can be a delightful project. They not only make your space feel more inviting but also reflect your taste and creativity.
Reclaimed Wood Wall Art
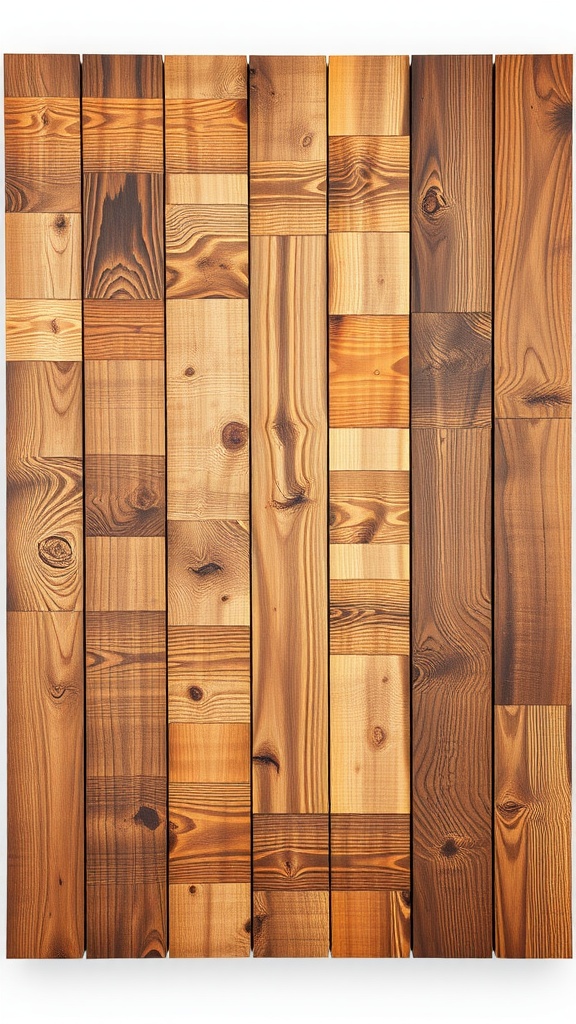
Reclaimed wood wall art brings a rustic charm to any space. The image showcases a beautiful arrangement of various wooden planks, each with its own unique grain and color. This diversity in wood tones adds depth and warmth to your walls.
Creating your own reclaimed wood art can be a fun and budget-friendly project. Start by collecting reclaimed wood from old furniture, pallets, or local recycling centers. You can then cut, sand, and arrange the pieces in a pattern that speaks to you.
Once you have your design, simply attach the pieces together using nails or strong glue. You can choose to leave the wood in its natural state or apply a coat of stain to enhance the colors. The finished piece can serve as a stunning focal point in your living room, hallway, or even a cozy bedroom.
Not only is this project a way to elevate your home decor, but it also promotes sustainability by reusing materials. So, gather your supplies and get ready to craft a statement piece that reflects your personal style!
Upcycled Wine Bottle Candles
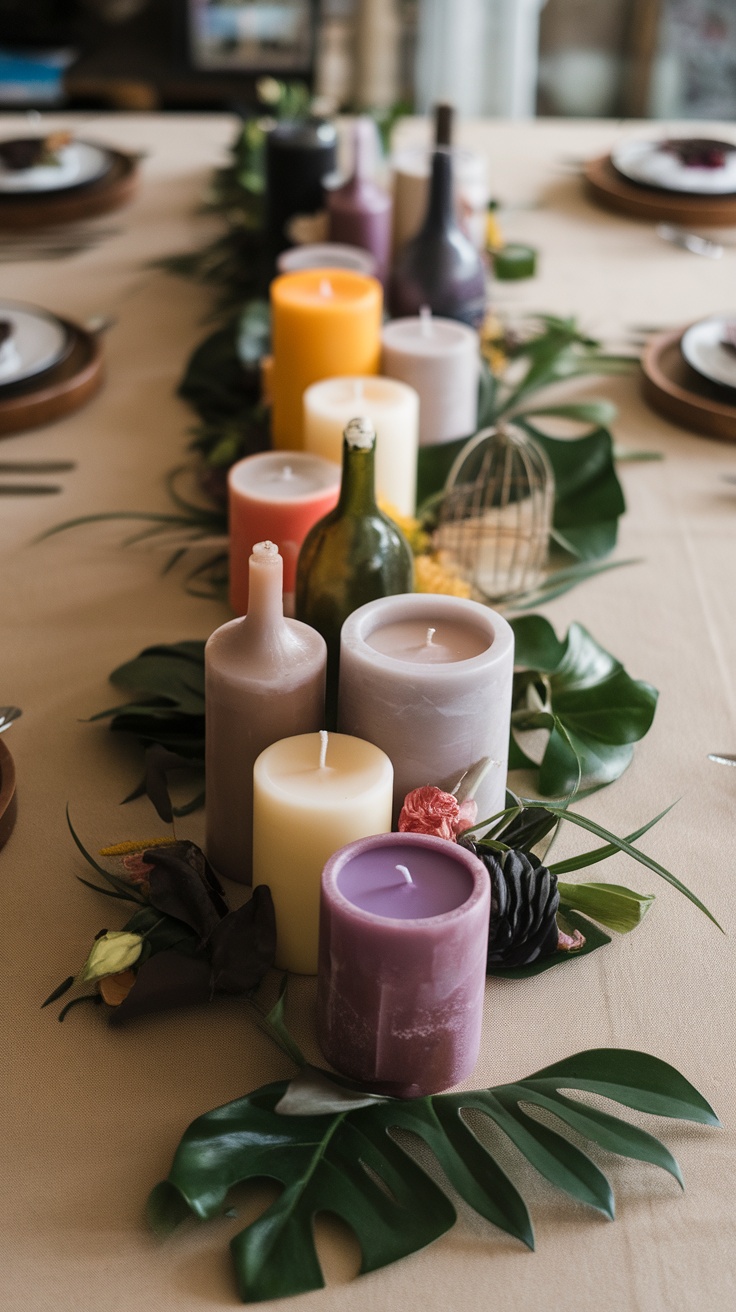
Transforming used wine bottles into beautiful candle holders is a fun and creative project that adds charm to your home.
In the photo, you can see several green wine bottles with candles nestled inside. This simple yet stylish design brings a warm and inviting glow to any space. It’s an excellent way to recycle bottles while creating an eye-catching centerpiece.
To make your own upcycled wine bottle candles, gather a few empty bottles, a candle or two, and a sturdy bottle cutter. Start by cutting the bottles to your desired height. After smoothing out the edges, place a candle inside each bottle. You can also use tealight candles for a different look!
Arrange your candle bottles on a table runner or tray for an elegant display. Consider matching the colors of the bottles to your décor or using a variety of bottles for a more eclectic feel.
DIY Painted Flower Pots

Adding a splash of color to your home with DIY painted flower pots is an easy and fun project. These vibrant pots can brighten up any space, whether on your porch, balcony, or windowsill. Using pots in different sizes and colors, like the cheerful yellow and blue ones in the image, creates a lively atmosphere.
To start this project, gather some terra-cotta or plastic pots, acrylic paint, and a few brushes. You can even use painter’s tape for clean lines or stencils for fun patterns. After painting, make sure to let them dry thoroughly before adding your favorite flowers. This allows you to customize your decor while keeping things budget-friendly. Plus, it’s a perfect way to express your creativity!
Planting your favorite flowers in these colorful pots not only enhances the beauty of your space but also brings a touch of nature indoors. Choose flowers that thrive in your climate, and don’t forget to water them regularly. By making your painted flower pots, you’ll enjoy both a handy gardening project and a vibrant home decor upgrade.
Framed Fabric Wall Hangings
Framed fabric wall hangings are a simple yet stylish way to transform your space. They add texture and personality without breaking the bank. You can choose fabrics that reflect your style, from bold patterns to soft, neutral tones.
The image shows a serene fabric wall hanging featuring palm trees and a city skyline. This piece not only serves as art but also brings a calming vibe to the room. It’s a perfect example of how fabric can enhance your decor.
To create your own, start by selecting a fabric that resonates with you. Cut it to size and stretch it over a wooden frame. Use a staple gun to secure the fabric on the back. Finally, hang it on your wall for a fresh look that feels inviting and cohesive.
Painted Wooden Signs
Painted wooden signs are a fantastic way to add personality to your home without spending a lot. They can serve as welcoming messages or fun decorations, and they’re easy to customize. Just look at this charming porch filled with various signs that convey different sentiments about home.
The signs showcased include words like ‘HOME’ and creative phrases that set a warm tone. You can see how they complement the overall look of the porch, making it inviting. Whether you want a rustic vibe or something more modern, painting your own signs allows for endless possibilities.
To make your own painted wooden signs, you’ll need some basic materials: wooden boards, paint, brushes, and stencils if you prefer a neat finish. Start by sanding the wood to create a smooth surface. Then, paint the background color of your choice. Once dry, use stencils to add your message, or freehand if you’re feeling bold. Finish with a sealant to protect your creation from the elements, especially if it’s going outdoors.
DIY Macramé Plant Hangers
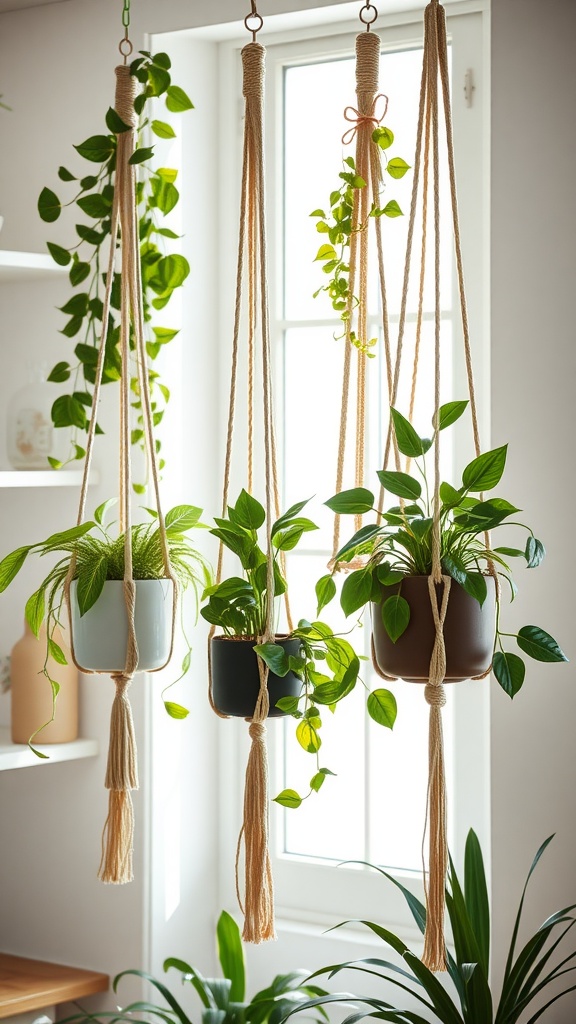
Macramé plant hangers are a stylish way to incorporate greenery into your home. They add texture and warmth, making your space feel more inviting. By hanging your plants, you also save precious counter or shelf space!
The image showcases three beautiful macramé hangers, each cradling a vibrant plant. The soft, natural tones of the macramé complement the colorful pots, creating a harmonious look. This setup not only highlights the plants but also enhances the natural light in the room.
Getting started with DIY macramé plant hangers is easier than you might think. You’ll need some macramé cord, scissors, and a few plant pots. Cut your cord into lengths of about 10-15 feet. Then, knot them together at one end and start creating your desired patterns. There are plenty of tutorials online to guide you through different designs!
Once your hangers are ready, find a sunny spot in your home. Hang your plants at different heights for a dynamic display. This not only adds interest but also allows your plants to thrive in varying light conditions. You’ll be amazed at how a little greenery can transform your space without breaking the bank!
Upcycled Dresser Storage

Transforming an old dresser into stylish storage is an easy and fun DIY project. In the image, we see a charming dresser that has been given a new life. Its light color and simple design make it a perfect fit for any room.
This dresser offers ample storage with its spacious drawers. You can use it for clothing, linens, or even as a catch-all for miscellaneous items. The added woven basket in one of the drawers adds a nice touch, making it both functional and visually appealing.
Don’t forget to personalize your dresser! You could paint it a bold color or add decorative knobs to give it your own flair. Pair it with some plants, photos, or art pieces on top to create an inviting space.
Using pieces like these not only saves money but also reduces waste, making it a smart choice for your home. So, if you have an old dresser sitting around, don’t hesitate to give it a fresh look!
Repurposed Ladder Bookshelf
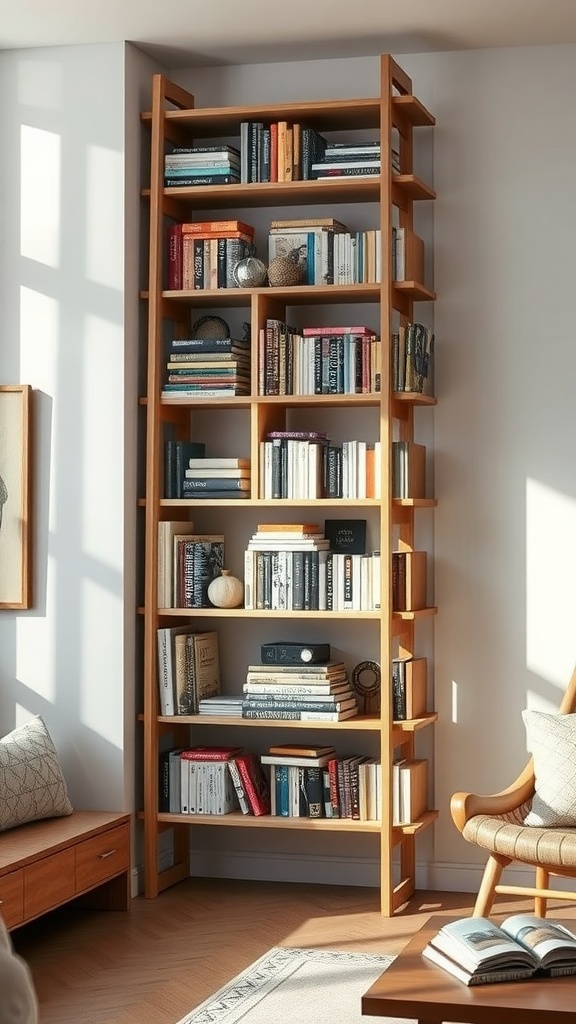
A repurposed ladder bookshelf is a stylish and functional addition to any room. This DIY project takes an old ladder and transforms it into a unique way to display your favorite books and decorative items.
The image showcases a beautifully crafted ladder bookshelf that fits snugly into a corner, maximizing space while adding character to the room. The warm wooden tones create a welcoming vibe, and the open shelves provide a perfect spot for books of all sizes.
It’s easy to customize this project to fit your style. You can leave the ladder in its natural state or give it a fresh coat of paint to match your decor. Adding personal touches, like plants or decorative boxes, can also enhance its appeal.
This project is not only budget-friendly but also encourages creativity. Scour your garage or local thrift stores for an old ladder, and with a little bit of effort, you can create a functional piece that elevates your home’s aesthetic.
Recycled Tire Garden Planters
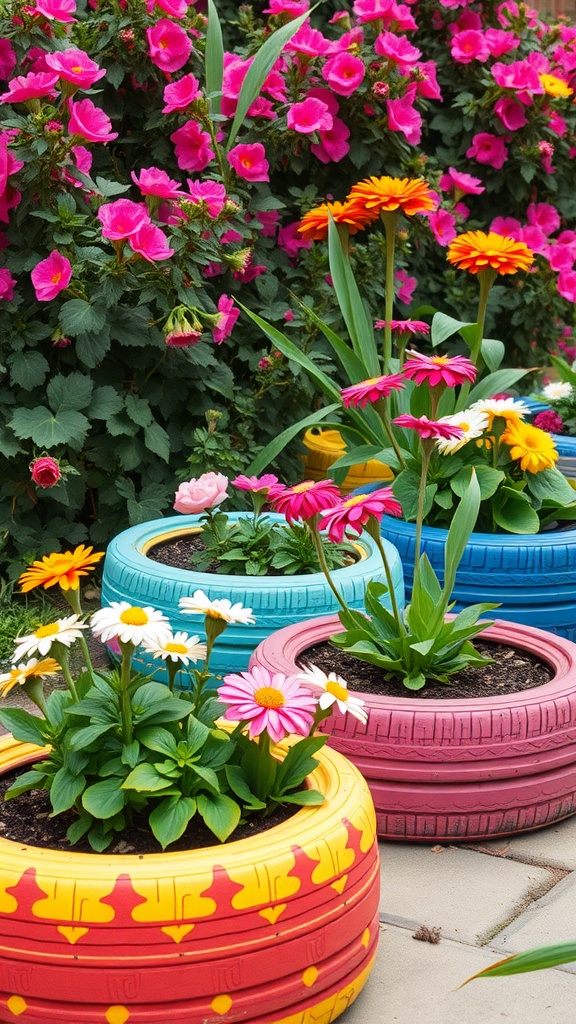
Transforming old tires into garden planters is not only eco-friendly but also adds a splash of color to your outdoor space. In the image, you can see vibrant planters made from discarded tires, each bursting with a variety of blooming flowers. The bright red, blue, and yellow colors create a lively contrast against the lush greenery and pink blooms in the background.
Creating these planters is a simple DIY project that requires minimal tools. Start by cleaning the tires to remove any dirt. Next, you can paint them in colors that match your garden theme. It’s a fun way to express your creativity!
After the paint dries, fill the tires with soil and plant your favorite flowers or plants. Consider using flowers that thrive in your climate, which will ensure that your garden looks vibrant throughout the seasons. This project not only enhances your garden’s aesthetics but also encourages you to recycle and reduce waste.
DIY Rustic Picture Frames
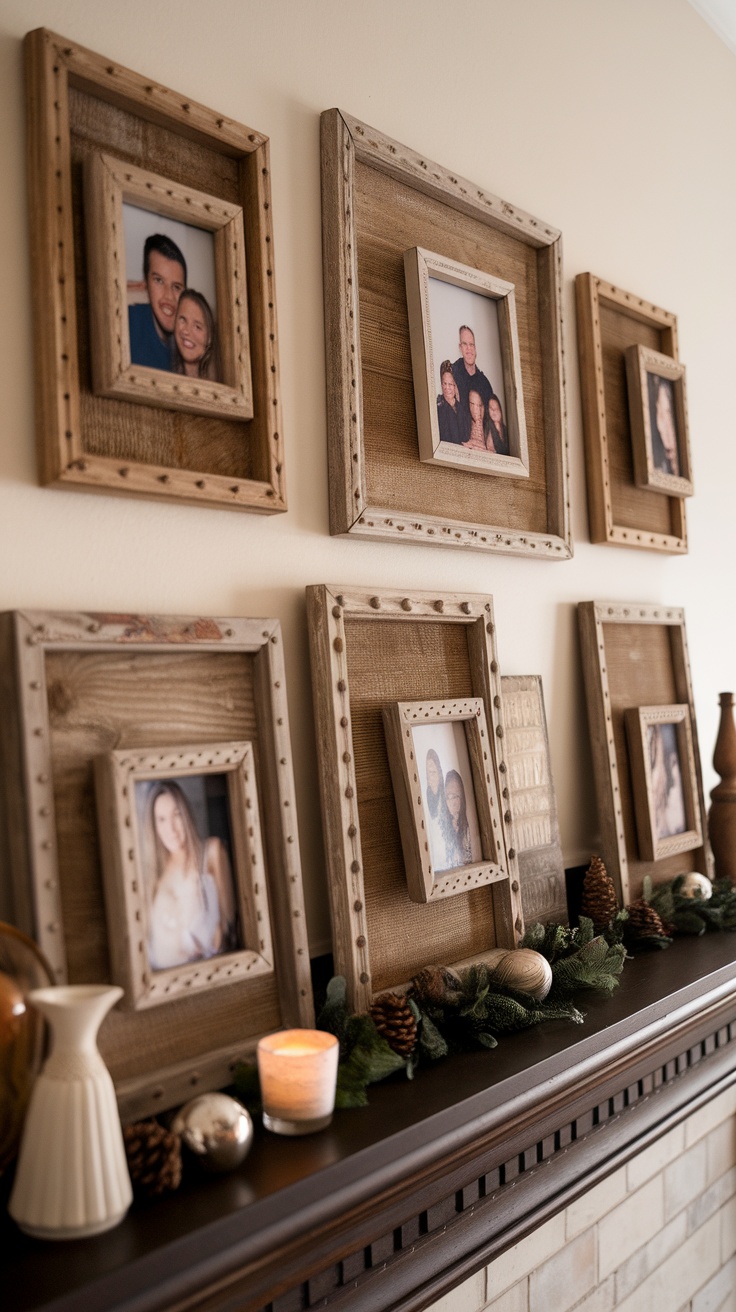
DIY rustic picture frames are a fantastic way to showcase your favorite memories while adding charm to your space. In the image, two beautifully crafted wooden frames sit atop a mantel, each holding cherished black-and-white photographs. The larger frame features a moment of joy, with a person joyfully fishing by a tranquil lake, while the smaller frame shows a group of people dressed up for a special occasion.
The warm tones of the wood create a cozy feel, making these frames perfect for any home decor style. Whether you’re going for a farmhouse vibe or something more modern, these frames can fit right in. They invite warmth and nostalgia, making your home feel more personal.
Creating these frames at home is easier than you might think. You just need some reclaimed wood, a few tools, and a little creativity. Start by measuring your desired frame size, then cut the wood accordingly. Sand the edges for a smooth finish, and assemble the pieces. A coat of wood stain can enhance the rustic look and bring out the natural grain.
Once your frames are ready, choose photos that resonate with you. Displaying meaningful images can turn your living space into a gallery of memories. So gather your supplies, channel your inner artisan, and get crafting!
Photo Collage Wall
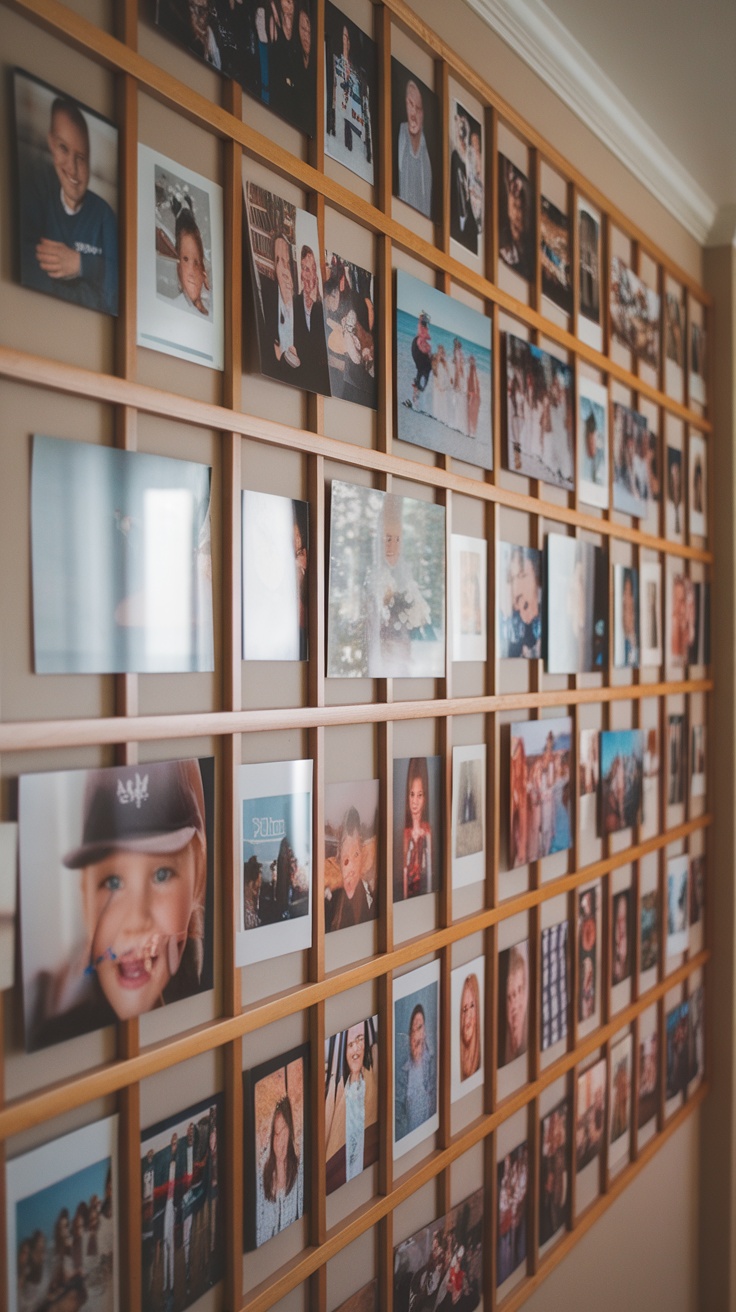
A photo collage wall is a fun and personal way to add character to your home. The image shows a hallway adorned with a vibrant orange wall, featuring a large collage of photos. This striking display not only serves as decor but also tells a story about the moments and people that matter most.
You can create your own photo collage wall with just a few materials. Start by gathering your favorite photos, whether they’re from family gatherings, vacations, or special events. You can mix and match different sizes and frames for a more dynamic look.
To arrange your photos, lay them out on the floor first to find a layout that you love. Once you’re happy with the arrangement, begin mounting the photos on the wall. Consider using washi tape for a casual vibe or classic frames for a more polished look. This project is budget-friendly and allows you to showcase your memories in a unique way.
Don’t forget to leave some space for additional photos or art pieces. As your collection grows, you can easily update your collage, keeping your home feeling fresh and lively.
DIY Curtain Tiebacks
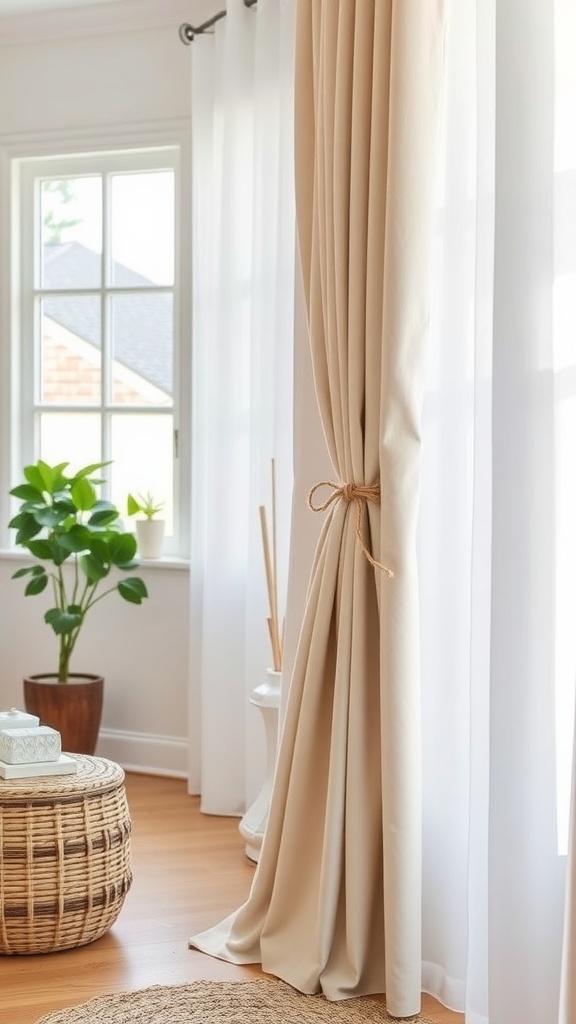
Curtain tiebacks are a simple yet effective way to elevate the look of your space. In the image, you can see a cozy room featuring light curtains held back by a natural-looking tie made of twine. This rustic touch adds warmth and charm, transforming plain curtains into a focal point.
Making your own curtain tiebacks is not only easy but also budget-friendly. You can use materials like rope, fabric scraps, or even decorative beads. The key is to choose something that complements your room’s decor.
To create your tiebacks, simply cut your chosen material to the desired length. You can add embellishments or keep it simple, depending on your style. Then, secure your curtains with the tiebacks, and enjoy the refreshed look they bring to your home.
Hand-Painted Garden Stepping Stones
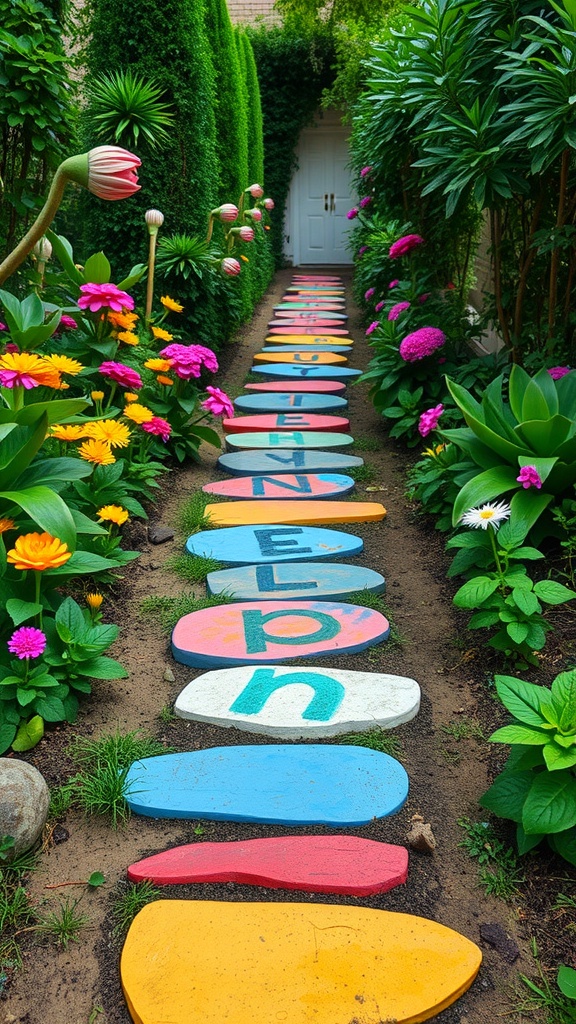
Transforming your outdoor space can be both fun and budget-friendly, especially with hand-painted garden stepping stones. These charming stones not only guide visitors through your garden but also add a splash of color and personality.
The image showcases a delightful path lined with vibrant, hand-painted stones that create a whimsical atmosphere. Each stone is uniquely designed, featuring various colors and playful letters, making each step a little adventure.
Creating your own stepping stones is simple and can be done in just a few steps. Start with basic materials like concrete mix, a mold (you can use anything from a baking tray to plastic containers), and paint. Once your stones are set and dry, unleash your creativity by painting them with designs that reflect your style or even messages that inspire joy.
Not only do these stepping stones enhance the beauty of your garden, but they also provide a practical pathway to navigate through your plants and flowers. Imagine strolling through your garden, stepping on brightly painted stones while surrounded by blooming flowers and lush greenery. It’s a delightful way to elevate your home’s outdoor charm without breaking the bank.
Customized Wall Shelves
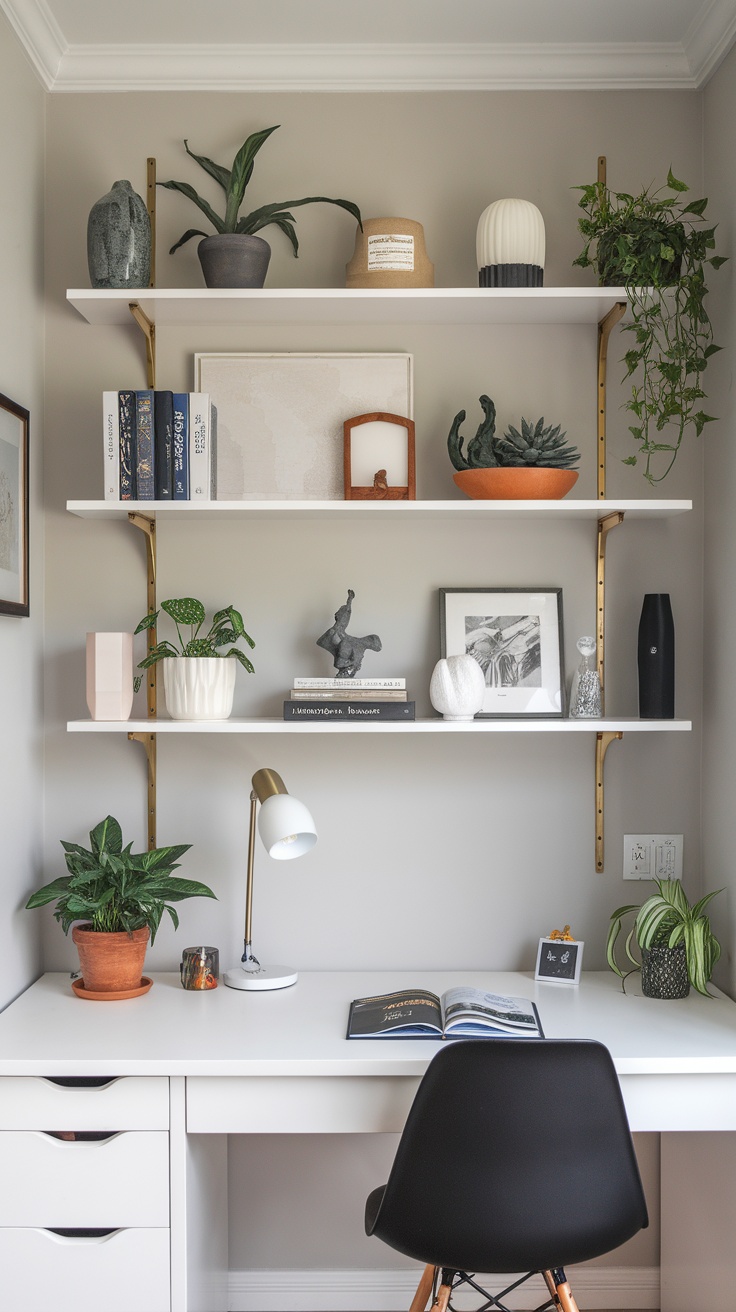
Wall shelves can be a simple yet stylish addition to any room. They provide space for photos, plants, and decorative items, all while keeping your area organized.
The image shows a stylish arrangement of customized wall shelves that really elevates the space. The black shelves contrast nicely with the light wall, making the decor pop.
Decorating these shelves allows you to express your personality. You can mix and match frames, books, and plants, creating a unique look that feels personal. It’s a fun way to showcase your favorite items.
Installing customized wall shelves is often budget-friendly. You can use reclaimed wood or even floating shelves from a local store. With a bit of creativity, you can design a look that fits your style without spending much.
Consider the layout before you start. Planning where each shelf will go helps you visualize the end result. It’s also handy to think about the kinds of items you want to display. This will guide your choice of shelf size and spacing.
Decorative Mason Jar Lanterns
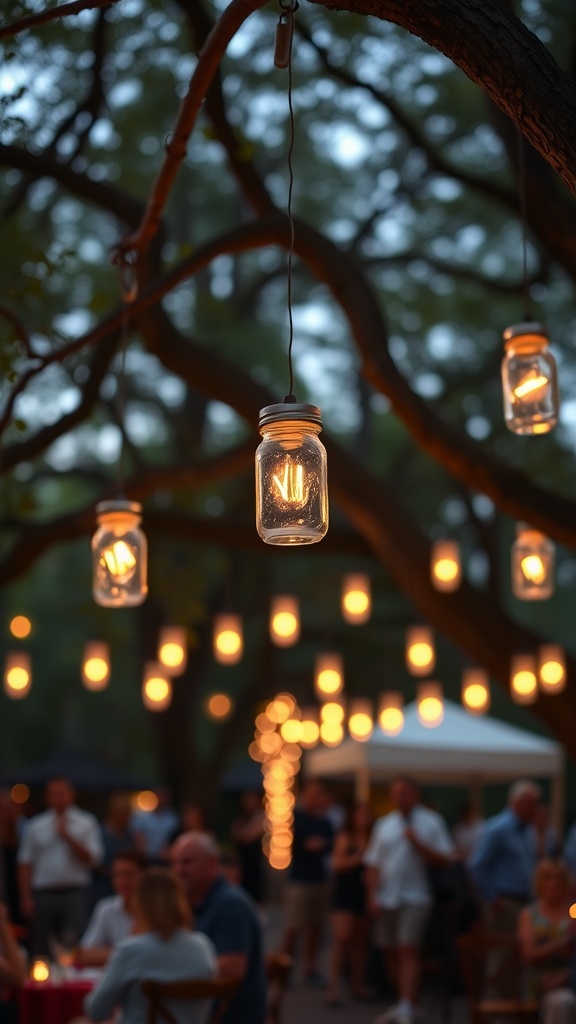
Mason jar lanterns are a fun and simple way to add charm to your space. Their warm glow creates a cozy atmosphere, perfect for gatherings with friends or family. In the image, you can see several mason jars hanging from branches, each filled with a soft light that illuminates the surrounding area. This creative project not only enhances your outdoor setting but also brings a personal touch to your home.
To make your own mason jar lanterns, gather a few materials: mason jars, string lights, and hooks or twine for hanging. Start by placing the string lights inside the jars. You can use battery-operated lights for convenience. Once filled, securely close the jars and hang them from tree branches or hooks in your backyard or patio.
This DIY project is budget-friendly and allows you to customize the look based on your style. You can even paint the jars or add decorative elements inside them for a unique twist. As you enjoy the soft glow of your mason jar lanterns, you’ll appreciate how easily they elevate your space.
Fabric Scrap Wall Art
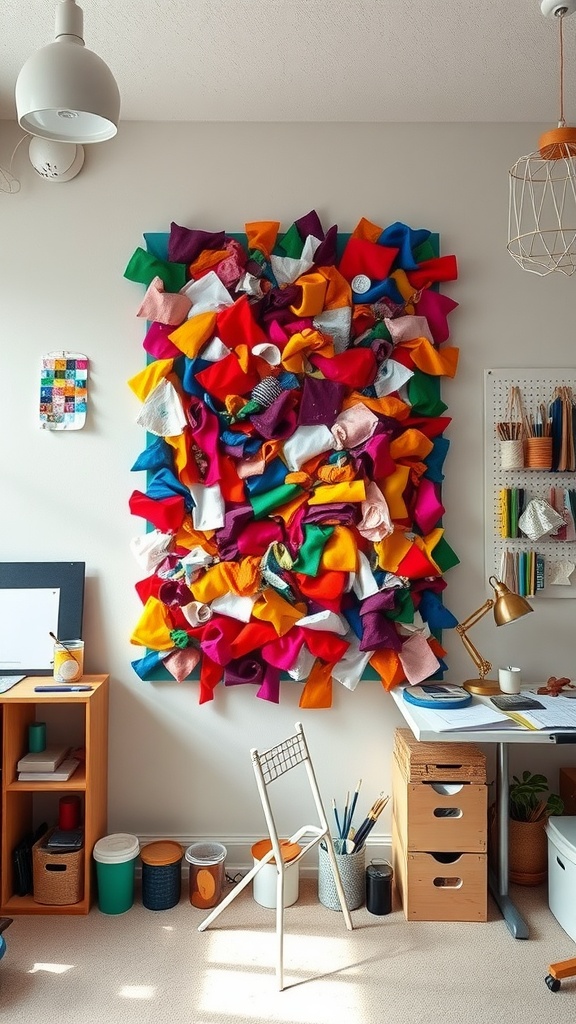
Transforming small pieces of fabric into a vibrant wall art display is a clever way to elevate your home decor without spending much. The image showcases a stunning example of fabric scrap wall art, bursting with colors and textures. It’s a fantastic DIY project that allows for personal expression and creativity.
The fabric pieces are arranged in a playful and chaotic manner, creating a visual feast for the eyes. Not only does this project add a splash of color to your room, but it also repurposes leftover fabric scraps, making it an eco-friendly choice. You can use old clothes, leftover fabric from previous projects, or even thrifted finds.
To create your own fabric scrap wall art, gather your materials. You’ll need a large canvas or a piece of plywood, fabric scraps of various colors and textures, scissors, and a hot glue gun. Cut the fabric into different shapes, and start gluing them onto your canvas in a way that pleases your eye. Don’t worry about making it perfect—embracing the imperfections is part of the charm!
This DIY project is not only budget-friendly but also a simple way to refresh your space. Hang your finished piece in a living room, home office, or even a child’s room for a burst of energy and creativity.
Stenciled Accent Wall
An accent wall can transform any room, and stenciling adds a personal touch without breaking the bank. The image shows a cozy living room with a stenciled wall that features an artistic quote. This creative approach can make your space feel more inviting and unique.
The stenciling technique is simple. First, choose your favorite quote or design. Make sure it resonates with you and fits the vibe of your home. Then, gather your materials: a stencil, painter’s tape, a sponge or brush, and paint in a color that complements your decor.
Applying the stencil is straightforward. Secure it to the wall with painter’s tape to prevent any slipping. Use a sponge or brush to apply paint within the stencil. It’s best to use a dabbing motion to avoid paint bleed. Once it’s dry, carefully remove the stencil to reveal your beautiful design!
In addition to the wall, consider adding some greenery, like the plants in the image, to bring life into the space. A stenciled accent wall is a fun way to express yourself, and it can easily become a focal point in your home.
DIY Floating Nightstands
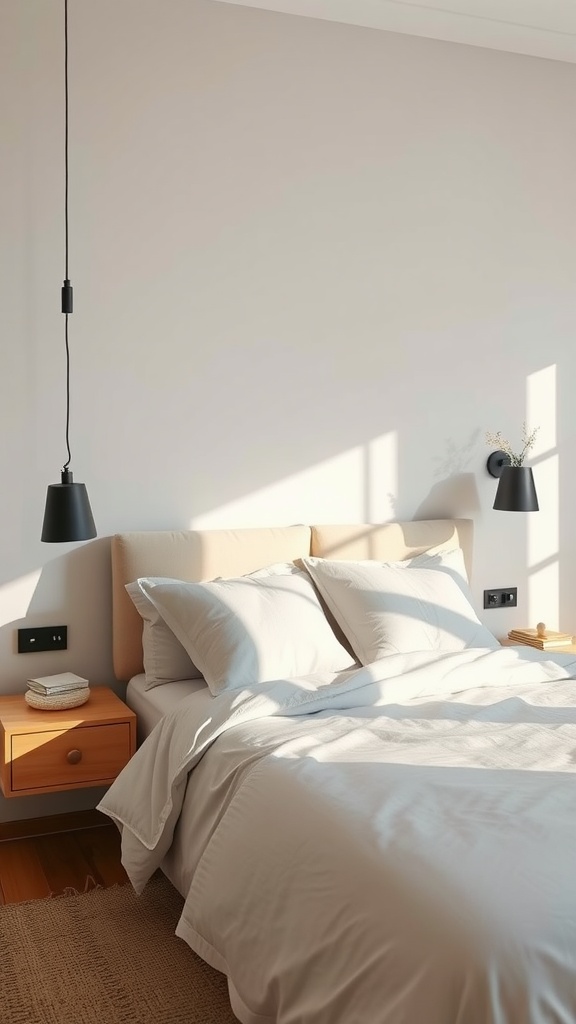
Floating nightstands are a stylish and functional option for any bedroom. They save floor space and add a modern touch to your decor. The image shows a serene bedroom with a clean design, highlighting the beauty of simplicity.
The nightstands in the picture are cleverly mounted on the wall, allowing the floor to remain open and airy. This makes the room feel larger and less cluttered. Plus, they provide just enough space for essentials like a lamp or a book.
If you want to recreate this look, all you need are some basic materials and tools. You can use wood planks to create the shelves and brackets to secure them to the wall. A bit of paint or stain can help match your decor. Installing them is a straightforward process, making it an excellent DIY project for beginners.
Overall, floating nightstands are an easy way to elevate your space on a budget. They combine practicality with style while also allowing for easy access to your bedside necessities.
Handmade Fabric Baskets
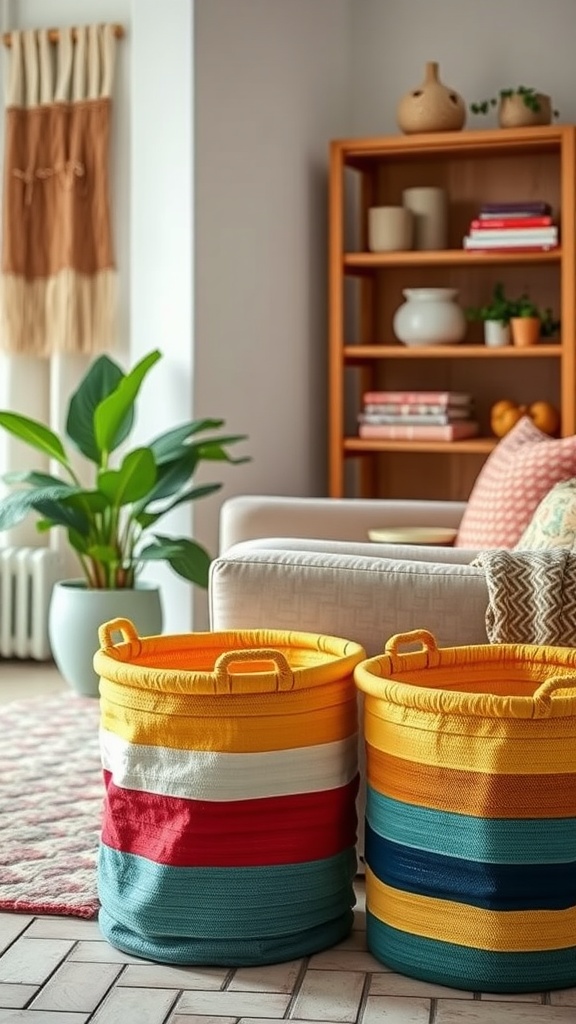
Handmade fabric baskets are a stylish and functional addition to any room. They can help keep your space organized while adding a pop of color to your decor. The image showcases two vibrant fabric baskets in cheerful colors, making them a perfect fit for a cozy living room.
Creating your own fabric baskets is a fun DIY project that won’t break the bank. You can use old fabric or even repurpose clothes you no longer wear. Just grab some fabric, a sewing machine, and a few basic supplies to get started.
To make these baskets, cut your fabric into strips and sew them together to form the desired shape. Adding handles makes it easier to move them around. You can customize the colors and patterns to match your home’s style, ensuring that each basket is uniquely yours!
These baskets can serve multiple purposes—use them for storage, as decorative pieces, or even as gift baskets. With just a little creativity and effort, you can elevate your home decor while staying on budget.
DIY Wall-mounted Pot Rack
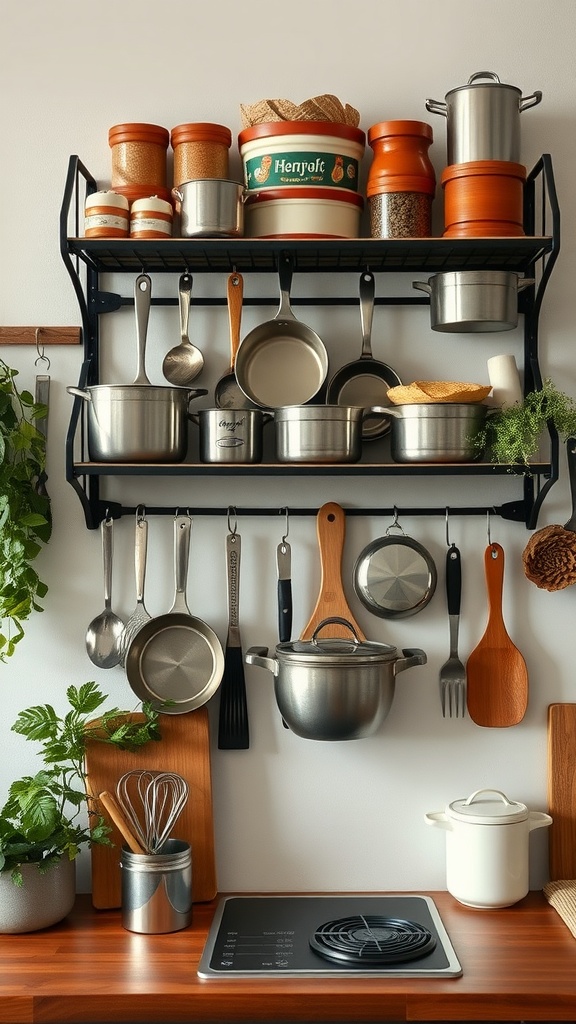
Transforming your kitchen can be both fun and budget-friendly, and a wall-mounted pot rack is a fantastic way to do just that. This image features a sleek and organized pot rack that’s both functional and stylish. It neatly displays various pots and cooking utensils, making them easily accessible while adding a touch of charm to the space.
The rack is made from sturdy materials, allowing it to hold multiple pots and pans. This keeps your cooking essentials within arm’s reach, saving you time when you’re in the kitchen. Plus, by hanging them up, you save valuable cabinet space for other items.
Incorporating greenery adds a fresh vibe, as seen with the potted herbs on the countertop. Herbs can not only elevate your dishes but also brighten up your cooking area. The combination of wood and metal in the design creates a warm yet modern feel, perfect for any kitchen.
To create your own wall-mounted pot rack, consider using brackets and a sturdy shelf or a ready-made rack from a home improvement store. Secure it above your countertop, and arrange your pots and utensils in a way that showcases your cooking style. This DIY project is not just practical; it also adds a personal touch to your kitchen.
Vintage Suitcase Storage
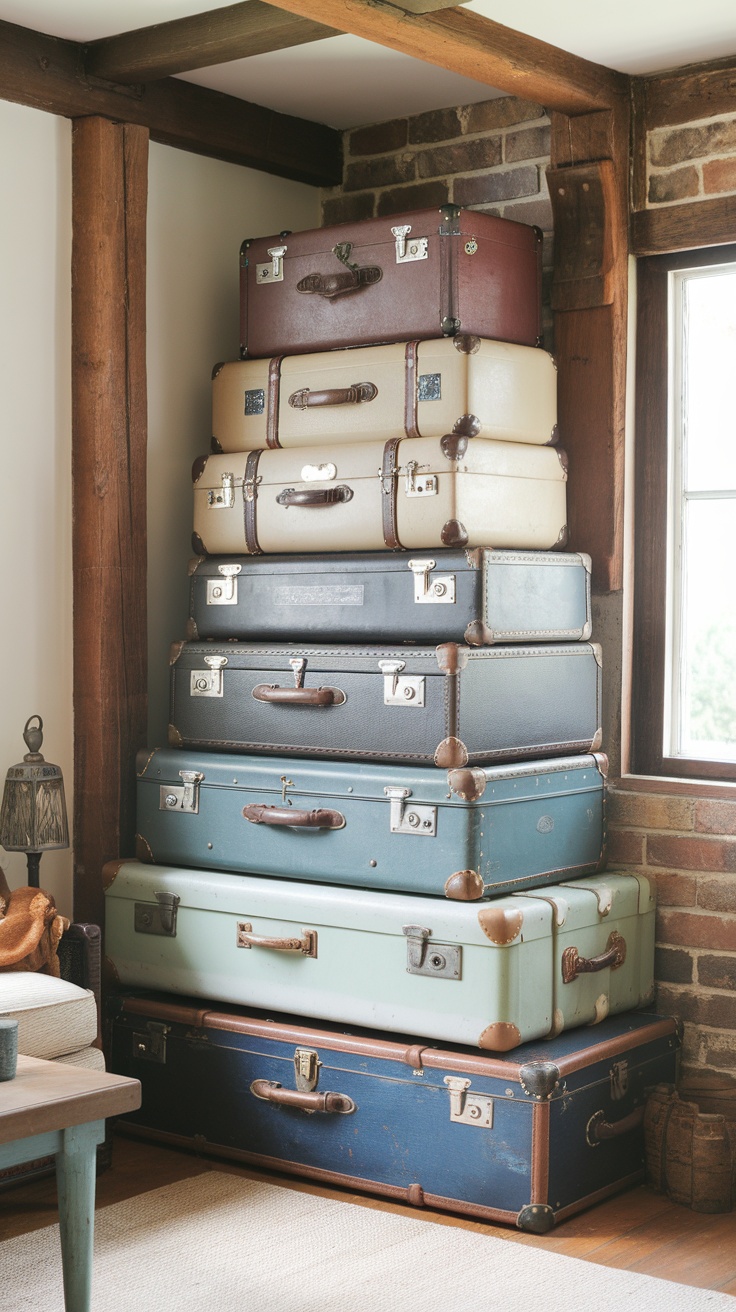
Transforming old suitcases into storage solutions is a clever way to add both style and functionality to your home. In the image, you can see a stack of colorful vintage suitcases that not only look charming but also serve as practical storage options. These suitcases are perfect for storing items like blankets, books, or seasonal clothes, keeping your space organized and clutter-free.
Using vintage suitcases doesn’t just save money; it also brings a touch of nostalgia and personality to your decor. You can find them at thrift stores or flea markets, making this a budget-friendly project. Choose suitcases with interesting patterns or colors to enhance your home’s aesthetic.
Consider placing a vase of fresh flowers on top, as seen in the image, to create an eye-catching focal point. This simple addition can brighten up the room and make the storage unit feel more inviting. Vintage suitcase storage is not only practical but also a fun way to showcase your creativity in home decor.
Upcycled Door Headboard
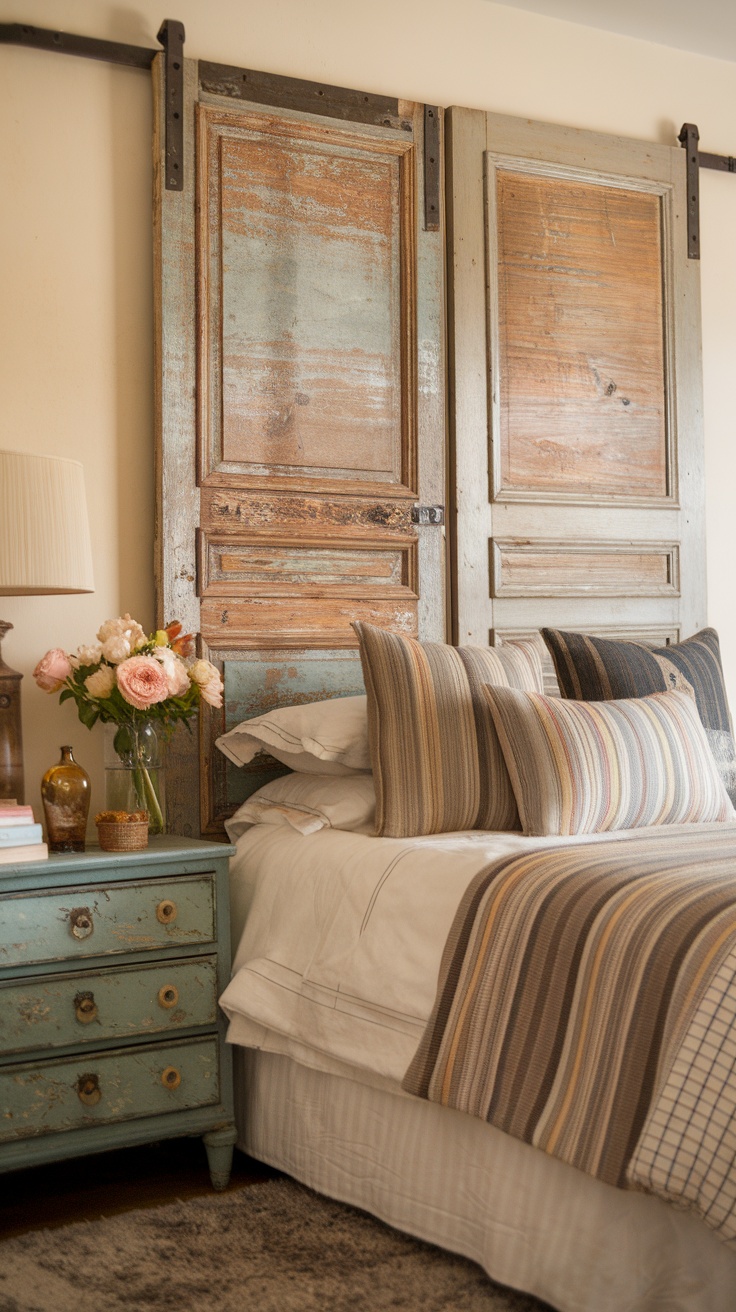
Transforming an old door into a headboard is a fun way to add character to your bedroom. This project not only saves money but also gives a unique touch to your space. Look at how the weathered white door serves as a charming backdrop for the bed, blending rustic charm with modern simplicity.
Start by finding an old door that you love. You can often find these at thrift stores or salvage yards. A little cleaning and some light sanding can go a long way in refreshing its look. If you prefer, you can also paint it in a color that matches your decor.
Once your door is ready, attach it to the wall behind your bed. This creates a beautiful focal point without the need for a traditional headboard. You can even leave the original hardware on for added interest. Pair it with cozy bedding and a few decorative pillows for a complete look.
DIY Coat Rack from Old Hooks
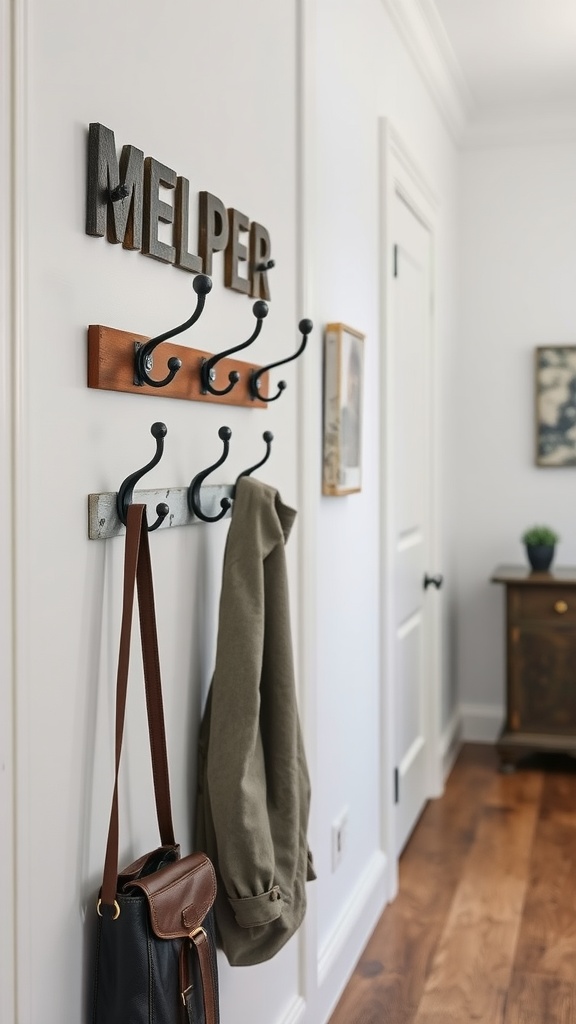
Transforming old hooks into a stylish coat rack is a fun and budget-friendly project. This simple DIY can add character to any entryway while keeping your space organized.
The image showcases a sleek coat rack with multiple hooks, perfect for hanging jackets and bags. The hooks are mounted on a wooden panel, giving it a warm touch. Above the hooks is a playful sign that reads ‘MELPER,’ adding a personal flair to your home.
To create your own, start by finding some old hooks, maybe from a thrift store or your garage. Grab a sturdy piece of wood, and paint or stain it to match your decor. Attach the hooks evenly spaced along the wood and secure it to your wall. Voila! You’ve made a functional piece that elevates your space.
This project is not just practical but also a great way to express your creativity. Customize it with your favorite colors or even add a small shelf on top for extra storage. It’s a delightful way to keep your home organized while showcasing your DIY skills.
Homemade Natural Wall Cleaner
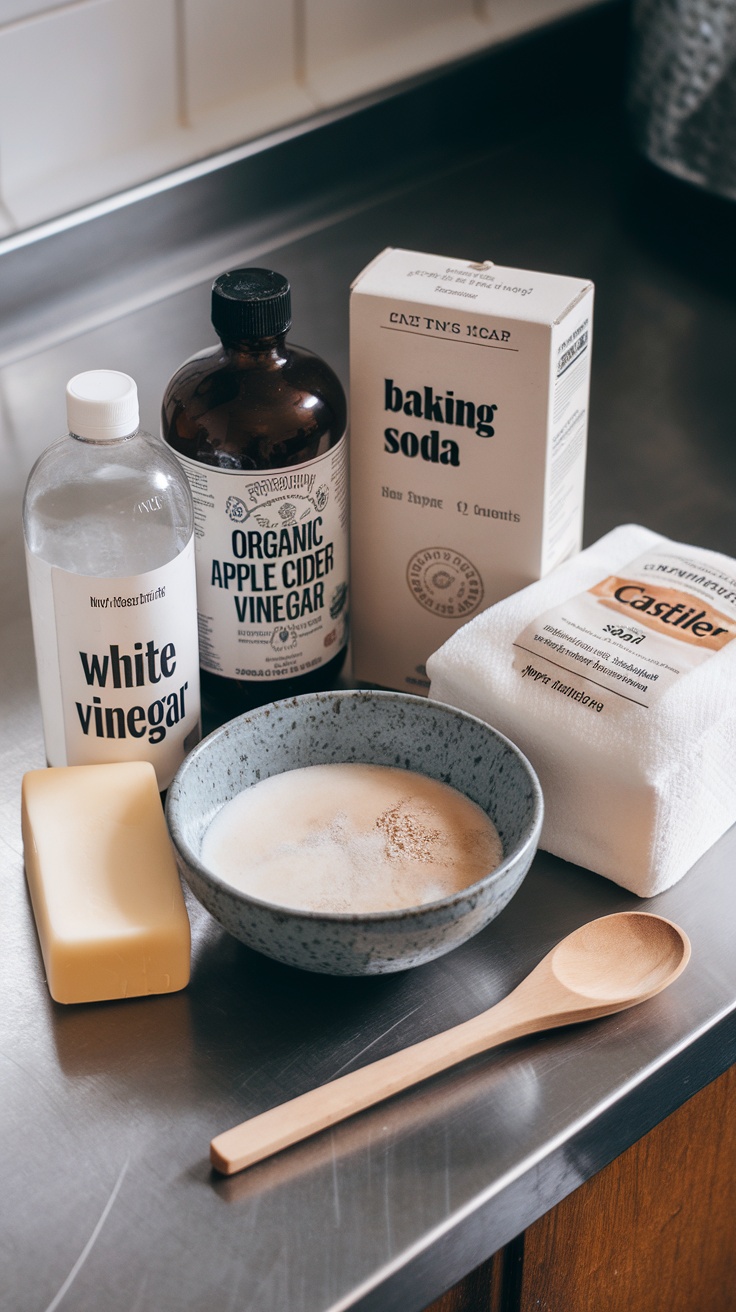
Keeping your walls clean doesn’t have to break the bank. With a few simple ingredients, you can whip up a natural wall cleaner that’s effective and safe for your home. The image shows an assortment of items you can use to make this cleaner, showcasing an inviting kitchen backdrop.
In the photo, you’ll notice various bottles, including a wall cleaner and a vinegar solution. Ingredients like fresh orange, mint, and honey are also displayed, emphasizing a fresh and eco-friendly approach to cleaning. All these elements come together to create a cleaner that’s not only practical but also pleasant to use.
To make your own natural wall cleaner, start with a base of water and vinegar. You can add a few drops of dish soap for extra cleaning power. Squeeze in some lemon or orange juice for a refreshing scent. Lastly, mixing in a teaspoon of honey can help with the sticky spots. Shake well and pour into a spray bottle.
When it’s time to clean, simply spray the solution onto your walls and wipe with a soft cloth. This method is gentle enough for most surfaces while being tough on grime. Plus, it leaves your home smelling fresh and clean without any harsh chemicals.
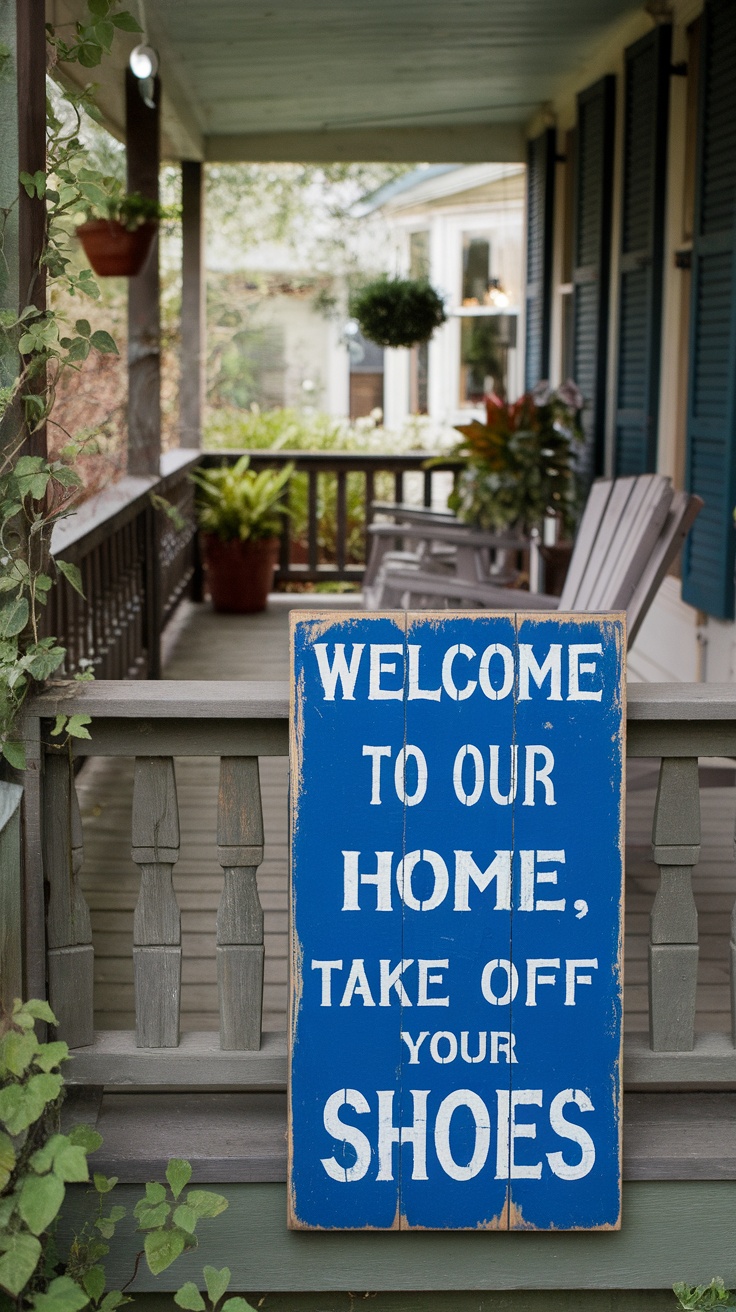
Personalized Family Name Sign
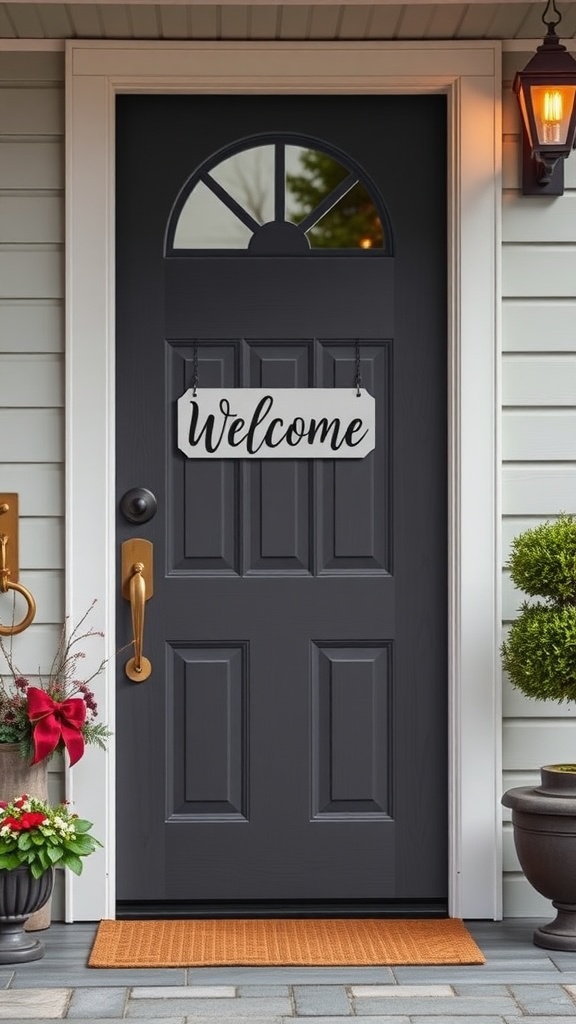
Creating a personalized family name sign is a delightful project that adds character to your home. Imagine a sign hanging on your front door, welcoming guests with your family’s name. This type of decoration is not just stylish, but also makes your home feel warm and inviting.
The image shows a charming door with a welcoming atmosphere. A wooden sign hangs neatly, inviting visitors to step inside. This simple touch instantly elevates the entryway. Adding your family name can make a similar sign even more special.
To make your own personalized sign, you can start with a piece of wood, some paint, and a stencil or vinyl letters. Choose colors that complement your home’s exterior. It’s a fun way to express your family’s identity and bring a sense of belonging to your space.
Whether you’re a DIY novice or a seasoned crafter, this project is accessible and rewarding. Plus, it’s an excellent way to spend a weekend afternoon. Gather your supplies, get creative, and enjoy the process of making something uniquely yours.
Upcycled Glass Jar Storage
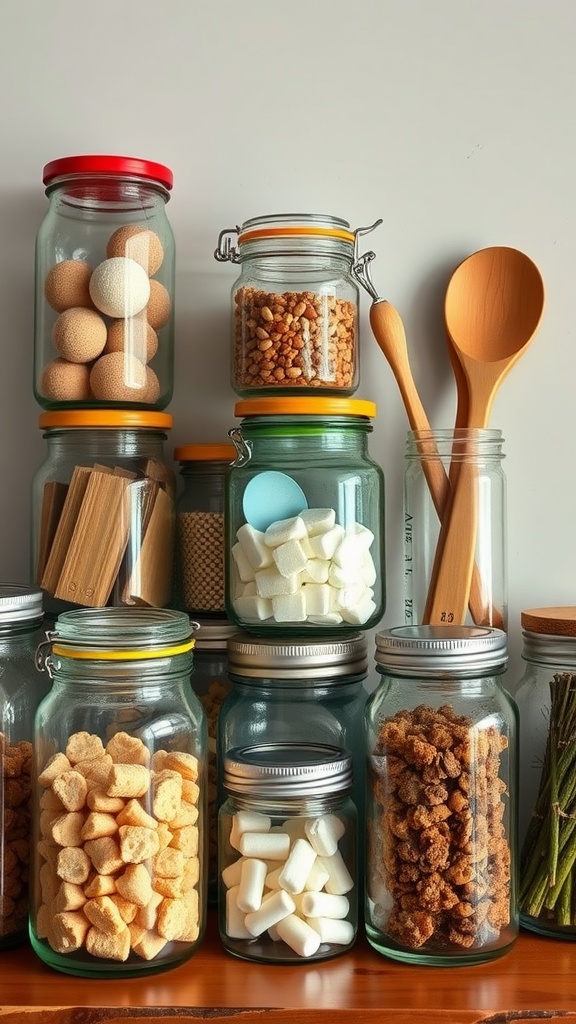
Upcycling glass jars is a fun and budget-friendly way to organize your home. In the image above, you can see a variety of glass jars with colorful lids, each filled with different items. This setup not only looks attractive but also serves a practical purpose.
These jars can hold snacks, crafting supplies, or even kitchen utensils. By using what you already have, you save money while adding character to your space. To create your own glass jar storage system, simply clean out any old jars you have and decide what to store in each one.
Labeling the jars can also add a personal touch and make it easier to find what you need. You can use chalkboard labels or even paint directly on the jar. This DIY project not only helps declutter but also brings a bit of creativity into your home.
Hand-Painted Wooden Coasters
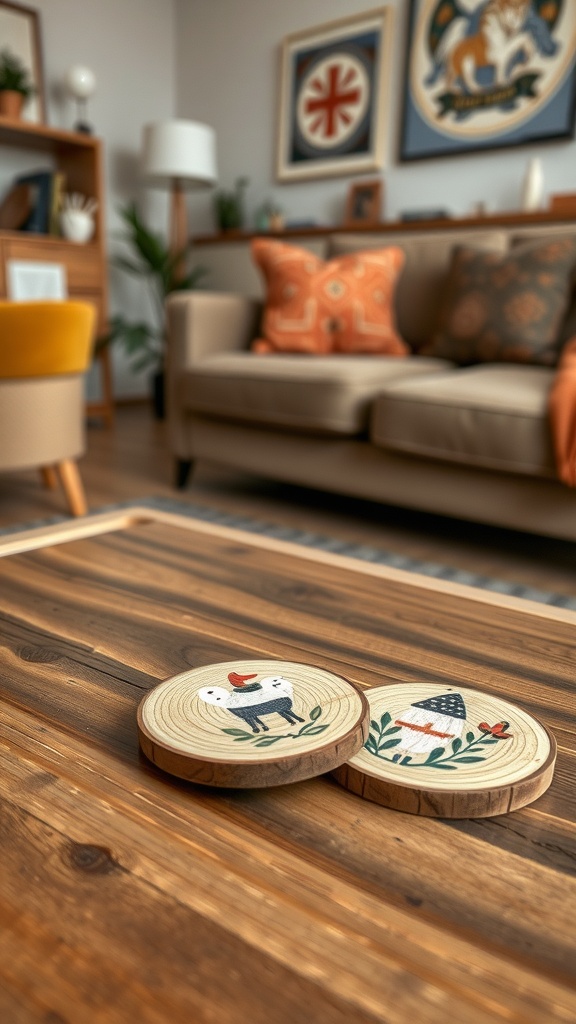
Hand-painted wooden coasters are a fun and practical DIY project that adds a personal touch to your home. These coasters not only protect your surfaces but also serve as delightful conversation starters. You can customize them with your favorite colors, patterns, or even meaningful designs.
In the image, you can see two beautifully painted coasters resting on a warm, wooden table. One features a charming animal design, while the other displays a whimsical house. This combination brings a cozy and inviting feel to the living space, perfectly complementing the soft, neutral tones of the surrounding furniture.
To create your own hand-painted coasters, all you need are some wooden rounds, acrylic paints, and a sealant to protect your artwork. Simply sketch your design on the wood, paint it with your chosen colors, and finish it off with a clear coat. It’s an easy project that can be completed in an afternoon and is great for all skill levels.
Not only do these coasters enhance your decor, but they also make thoughtful gifts for friends and family. Plus, you can create a matching set to elevate your coffee table or dining area without breaking the bank!
Customized Chalkboard Wall
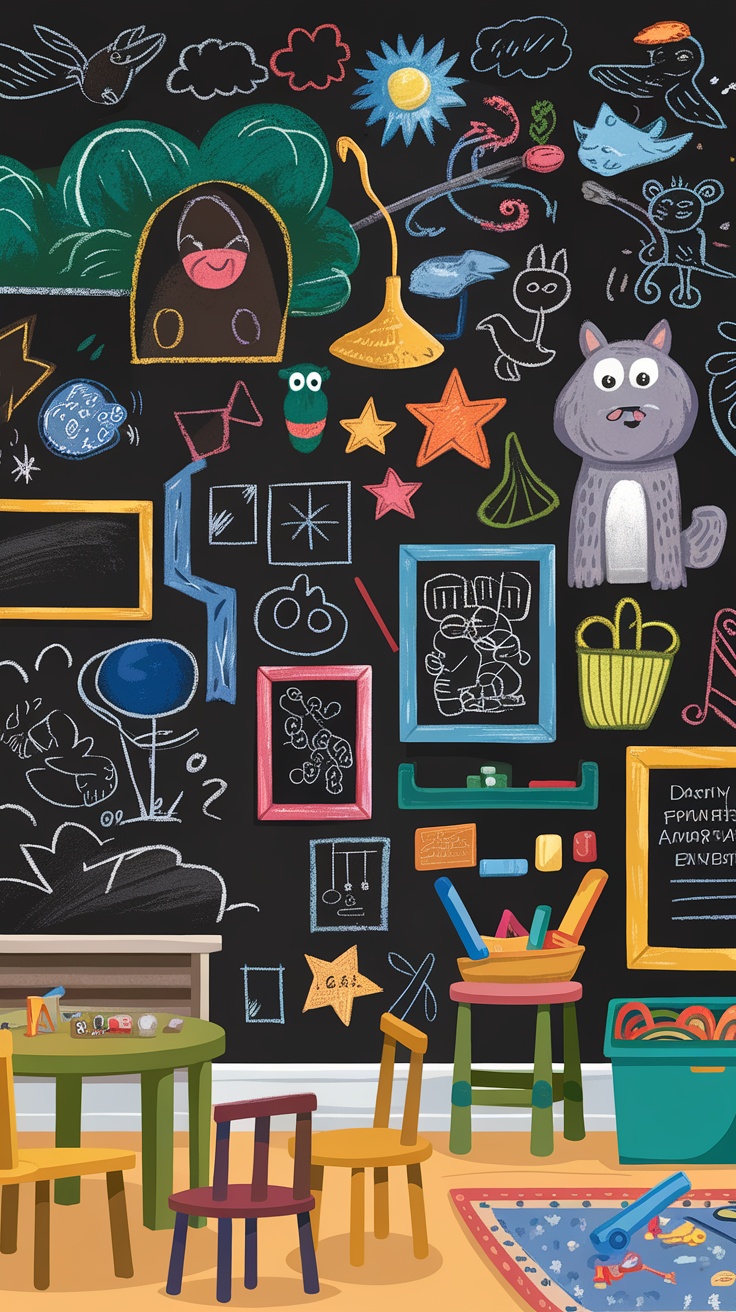
A customized chalkboard wall can transform any room into a fun and interactive space. This image showcases a vibrant chalkboard wall filled with colorful doodles and messages. It’s a perfect way to add personality to your home.
The playful designs, from stars to hearts, allow for creativity and expression. You can change the drawings and notes as often as you like, keeping the space fresh and inviting. This is particularly great for family rooms or kids’ play areas.
To create your own chalkboard wall, start by painting a section of your wall with chalkboard paint. Once it’s dry, grab some colorful chalk and let your imagination flow. It’s a simple DIY that encourages everyone in the household to join in on the fun!
Repurposed Old Furniture
Giving new life to old furniture is a fantastic way to save money while adding personality to your home. Take a look at the simple chair in the image. It has a classic design and a natural wood finish that can fit into many styles of decor.
Instead of tossing out old pieces, consider how they can be transformed. A fresh coat of paint or a new cushion can make a big difference. For example, the chair shown here has a charming throw pillow that enhances its appeal. It’s a small touch that brings comfort and style.
You can also mix and match different furniture styles. The chair stands out next to the cozy couch and adds an eclectic feel to the room. It’s all about finding what works for you and your space. Plus, repurposing furniture can be a fun weekend project!
Don’t forget to accessorize with plants or artwork, like the painting in the background. These elements can tie the room together and make it feel inviting. Repurposing furniture not only saves money, but it also allows you to express your creativity in ways that reflect your tastes.
Decorative String Lights
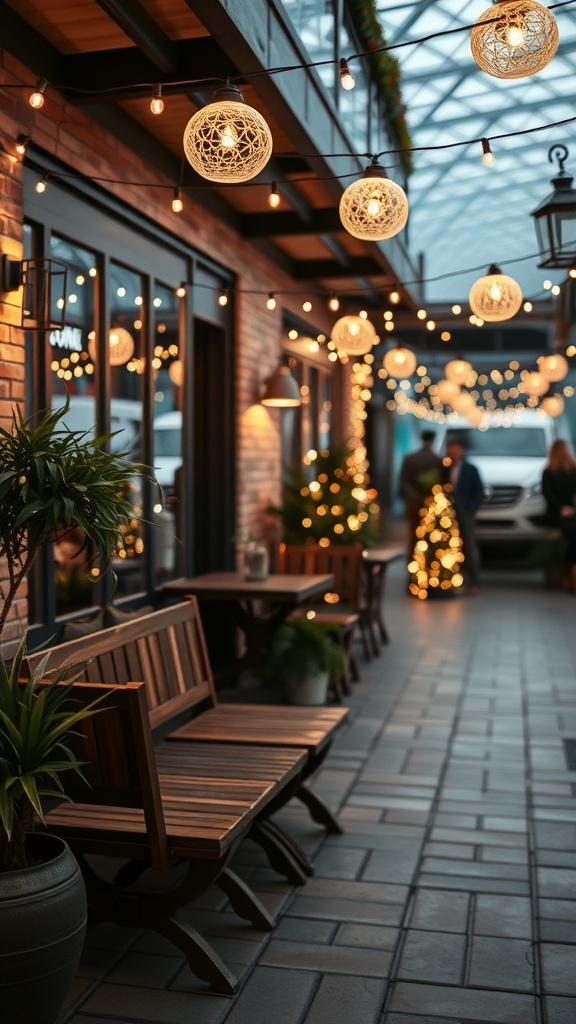
String lights have the power to transform any space into a cozy retreat. In the image, you can see beautiful decorative lights hanging in an inviting outdoor area. The soft glow of the lights creates an atmosphere that’s perfect for relaxing evenings with friends or a quiet night alone.
These lights come in various styles, from classic bulbs to whimsical shapes like woven globes. You can easily hang them along walls, around windows, or even drape them across furniture. The warm hues add a touch of charm and character to your home without breaking the bank.
Creating your own decorative string lights is straightforward and fun. All you need are some fairy lights, a few decorative items like mason jars or paper lanterns, and a little creativity. Simply attach the lights to your chosen items and hang them up for an instant mood boost.
Not only do these lights look lovely, but they also provide subtle lighting for gatherings or quiet moments. So, if you’re looking to elevate your space on a budget, decorative string lights are a delightful choice!
DIY Wind Chimes from Recyclables
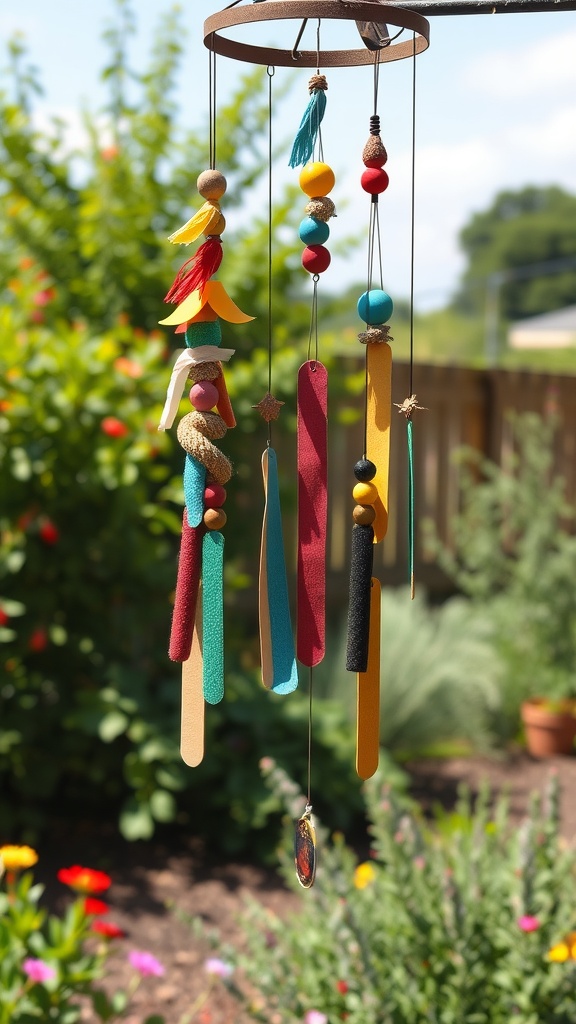
If you’re looking to add a personal touch to your outdoor space, making DIY wind chimes from recyclables is a fun and budget-friendly project. The image showcases a vibrant wind chime, crafted with colorful materials, hanging gracefully in a garden setting.
This particular design features an assortment of elements, including painted wooden sticks, beads, and even some fabric accents that sway gently in the breeze. The combination of textures and colors creates a playful vibe, inviting nature into your home.
Collecting items like popsicle sticks, leftover beads, or even fabric scraps can easily transform into beautiful chimes. All it takes is a little creativity and some basic crafting supplies like string and a sturdy base to hang everything from.
Simply string the materials together, ensuring a mix of shapes and colors to catch the eye. When the wind blows, you’ll enjoy the soothing sounds and the delightful sight of your handmade creation dancing in the air.
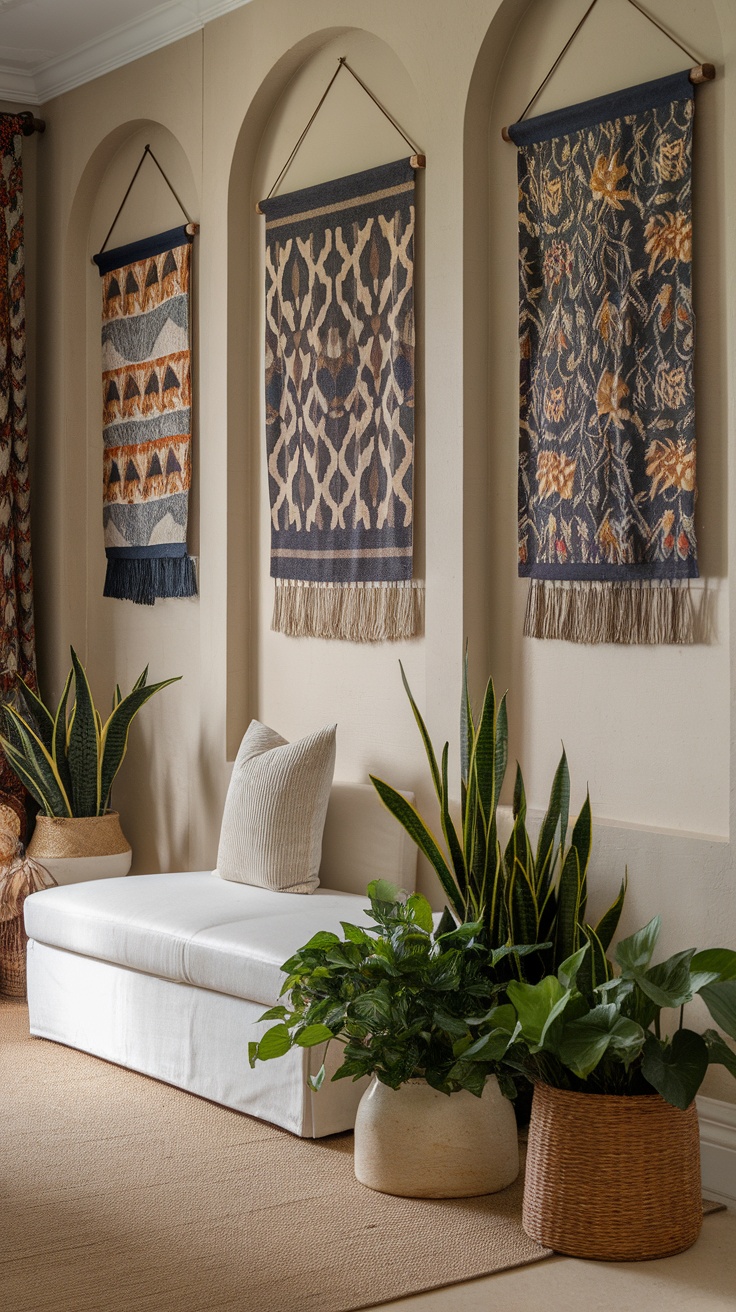
Hand-stitched Wall Decor

Hand-stitched wall decor is a fun and creative way to personalize your living space without breaking the bank. The image showcases a vibrant textile piece filled with charming details that invite the eye to explore every stitch.
The central message, ‘to the creat,’ is framed by playful elements like mountains, a cute little house, and whimsical animals. This design not only adds color to the wall but also a sense of warmth and inviting charm. Each crafted item tells a story, making it a unique focal point in any room.
Creating your own hand-stitched decor is easier than you might think. All you need are some basic materials like fabric, yarn, and a little creativity. You can start small with simple shapes and gradually include more intricate designs, just like those in the image. This DIY project allows you to express your personality and style.
Hang your masterpiece in a living room, bedroom, or even a hallway to brighten up the space. This type of wall decor not only enhances the ambiance but also serves as a conversation starter. Gather some friends, grab your supplies, and let your imagination run wild!
DIY Wall Art and Decor Ideas
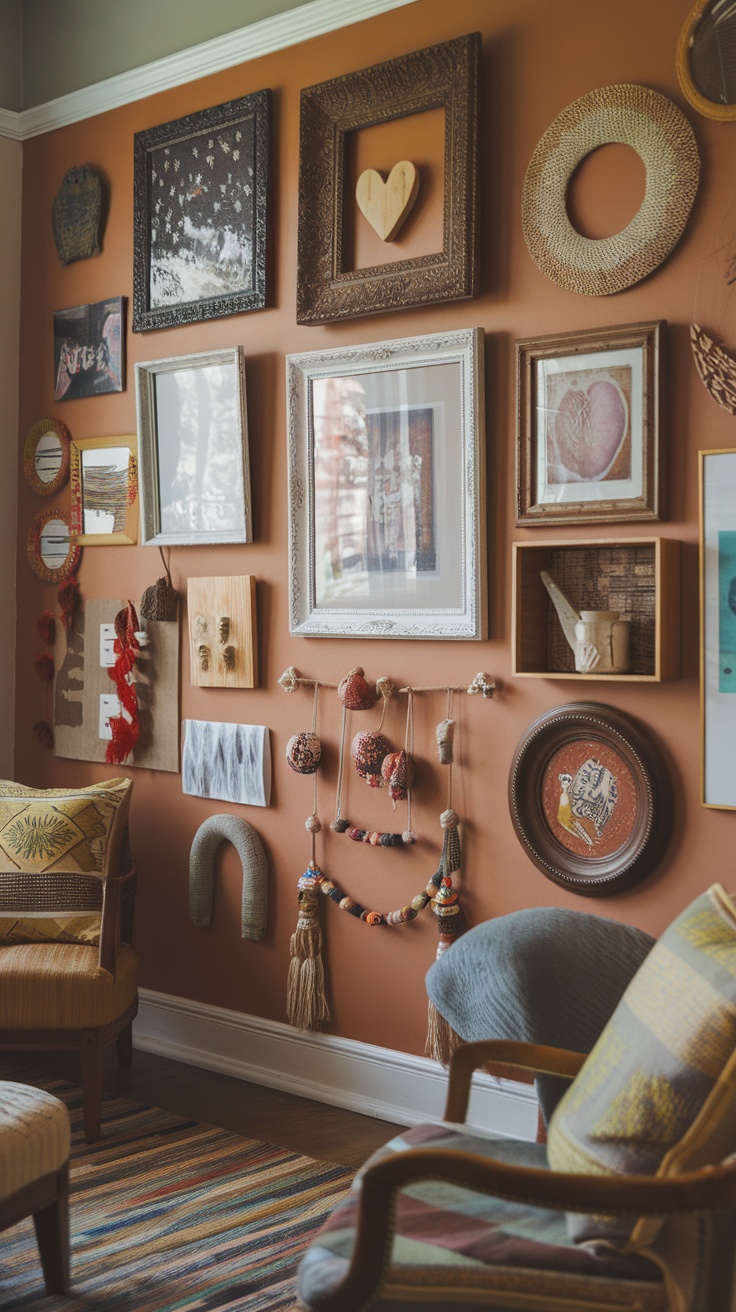
In your quest to elevate your home without breaking the bank, DIY wall art can be a fun and rewarding project. The image shows a lively and colorful gallery wall filled with different framed artworks. This vibrant display makes an ordinary wall feel special and can transform a room’s atmosphere. By mixing various art styles and colors, you can create a personal touch that reflects your personality. You can also use thrifted frames or even create your own art using simple materials. It’s a budget-friendly approach to add character to your space while showing off your creativity. Consider involving family or friends for a fun art night, where everyone can create something unique to add to the wall. Don’t worry about making everything match; the charm often lies in the eclectic mix of pieces!
Upcycled Planter Ideas for a Stylish Garden
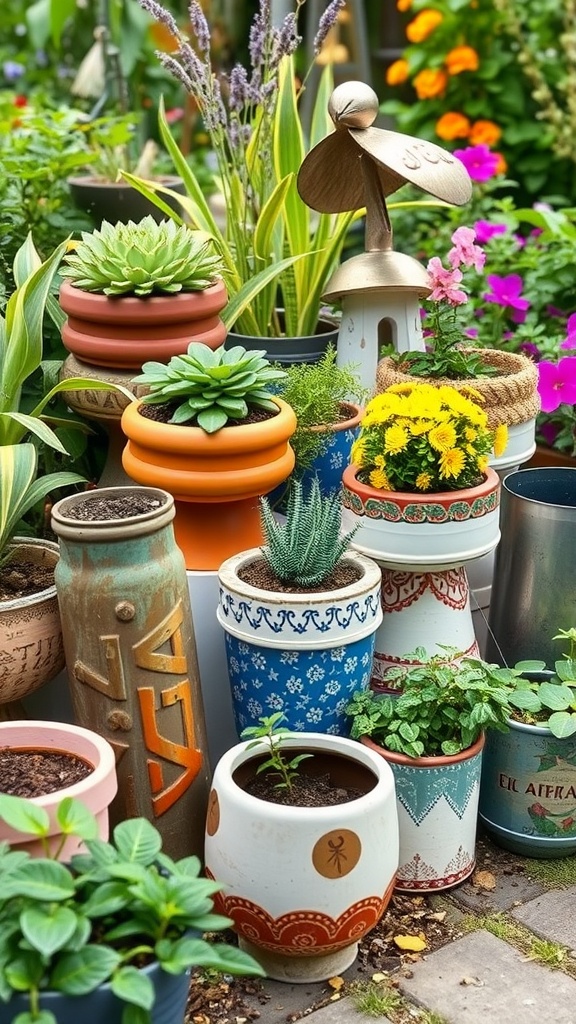
When it comes to adding character to your garden, upcycled planters can do the trick beautifully. The image captures a charming display of various upcycled pots, each bursting with life and creativity. From colorful terracotta pots to unique containers, this arrangement shows how you can transform everyday items into stylish garden accents.
Notice the different shapes and patterns of the pots. Some are painted with intricate designs, while others have a rustic, vintage look. This variety not only adds visual interest but also reflects a personal touch that makes your outdoor space feel special. Using what you already have is a budget-friendly way to enhance your garden.
Consider how you can incorporate similar ideas. Old jars, tin cans, or even wooden crates can serve as delightful planters. Give them a fresh coat of paint or add some decorative elements to match your garden’s vibe. This DIY approach allows you to express your creativity while being eco-conscious.
Upcycled Furniture Transformations
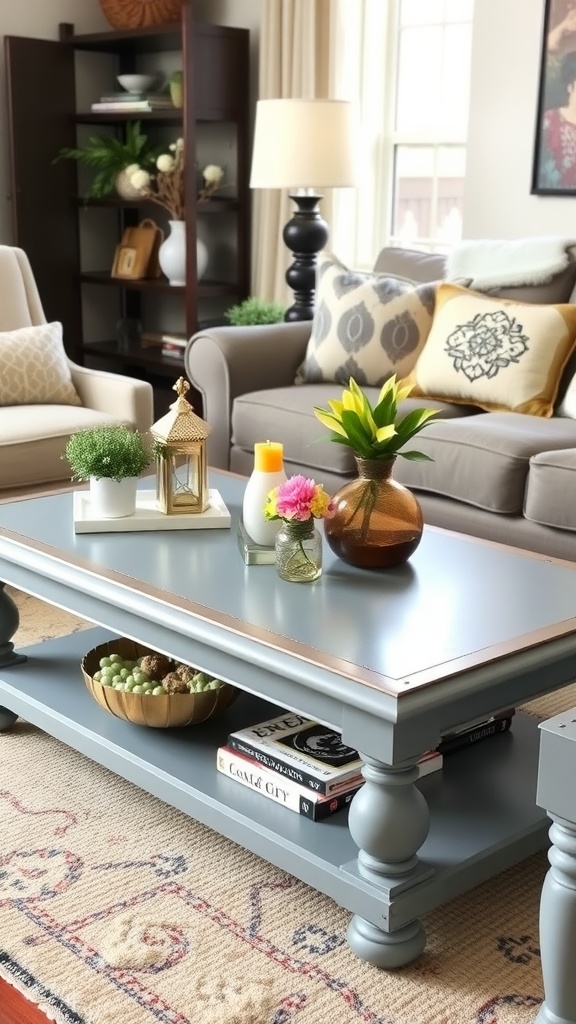
Upcycled furniture can breathe new life into your living space while saving you money. The image above showcases a beautifully transformed coffee table that exemplifies this trend. With its fresh gray paint and stylish design, it stands out as a centerpiece in the room.
This coffee table features a polished look and decorative details that elevate its charm. You can see how it’s paired with colorful accents like a vase of fresh flowers and a few candles, making it not just functional but also a decorative piece.
Incorporating upcycled furniture into your home is a fun and creative process. You can look for old tables, chairs, or cabinets and give them a new finish or a fresh coat of paint. Simple changes can make a significant impact on your space.
Think about how you can make use of items you already own. Whether it’s adding some new hardware, repainting, or simply rearranging, the possibilities are endless. Upcycling not only adds character but also tells a story, making your home truly unique.
DIY Decorative Ladder Shelf
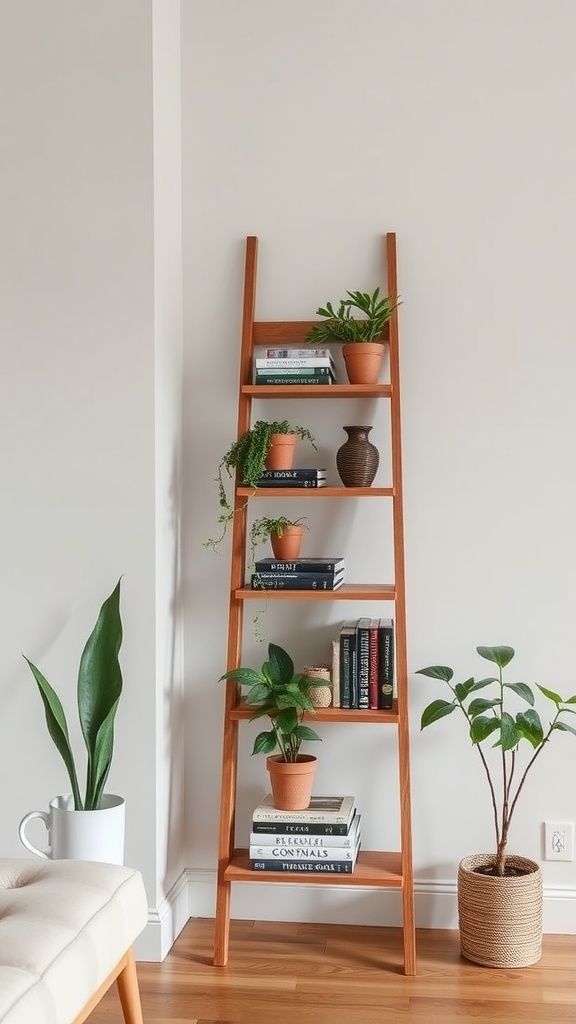
If you’re looking to add some charm to your space without breaking the bank, a DIY decorative ladder shelf is a fantastic option. This stylish piece can serve both functional and aesthetic purposes, making it a great project for any home.
The image shows a beautifully crafted ladder shelf, resting against a wall. It’s painted in a warm wood tone, which adds a cozy feel to the room. You can see that it has multiple shelves, each adorned with plants, books, and decorative items. These elements create a lively yet organized look.
Building your own ladder shelf is simple and requires just a few materials. You’ll need wooden boards, screws, and a bit of paint or stain. Start by cutting the boards to your desired lengths and assemble them into a ladder shape. Once you have the basic structure, feel free to get creative with colors and finishes.
After completing your ladder shelf, you can style it to fit your personal taste. Consider using pots for plants to bring some greenery indoors. Stack your favorite books or display cherished decor items to make it uniquely yours. This project not only enhances your space but also gives you a sense of accomplishment.
Fabric-Covered Bulletin Board
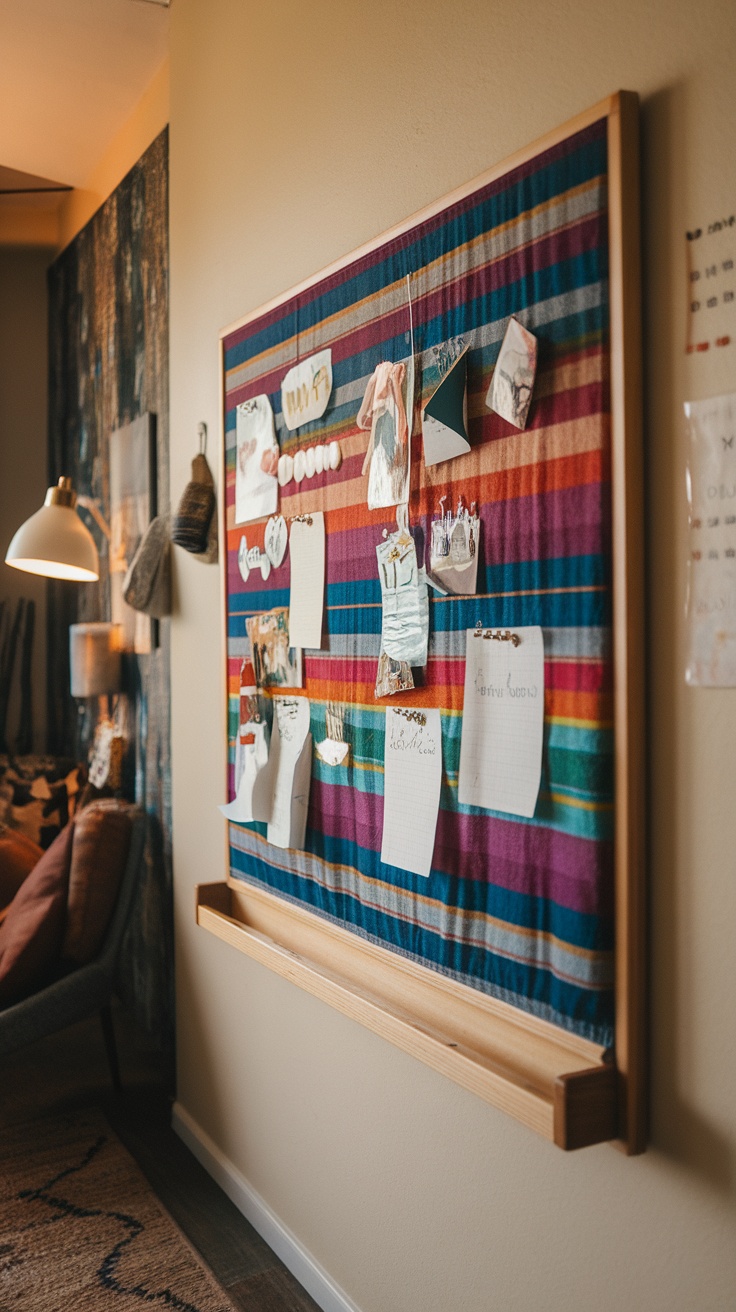
A fabric-covered bulletin board is a fun and stylish way to organize your thoughts, memories, and important reminders. This DIY project not only serves a practical purpose but also adds a splash of color to your wall. You can personalize it to match your home decor, making it a unique piece that reflects your personality.
To create your own bulletin board, start by selecting a fabric that you love. Bright patterns can energize a space, while softer colors can create a calming effect. Once you have your fabric, you’ll need a cork board, some adhesive spray, and a few push pins. Simply cut the fabric to size, spray the board with adhesive, and wrap the fabric around the edges. Secure it with push pins, and voilà! You have a beautiful base for displaying photos, notes, and memories.
The bulletin board shown in the image bursts with color and creativity. It features a variety of photos and notes pinned up, showcasing personal moments and reminders. Using a fabric that stands out makes it an eye-catching focal point in any room. It’s not only functional but also allows you to change out the items displayed whenever you want, keeping your space feeling fresh and new.